TOYOTA tC 2016 Accessories, Audio & Navigation (in English)
Manufacturer: TOYOTA, Model Year: 2016, Model line: tC, Model: TOYOTA tC 2016Pages: 164, PDF Size: 6.21 MB
Page 91 of 164
1. SETUP OPERATION 1. SETUP OPERATION
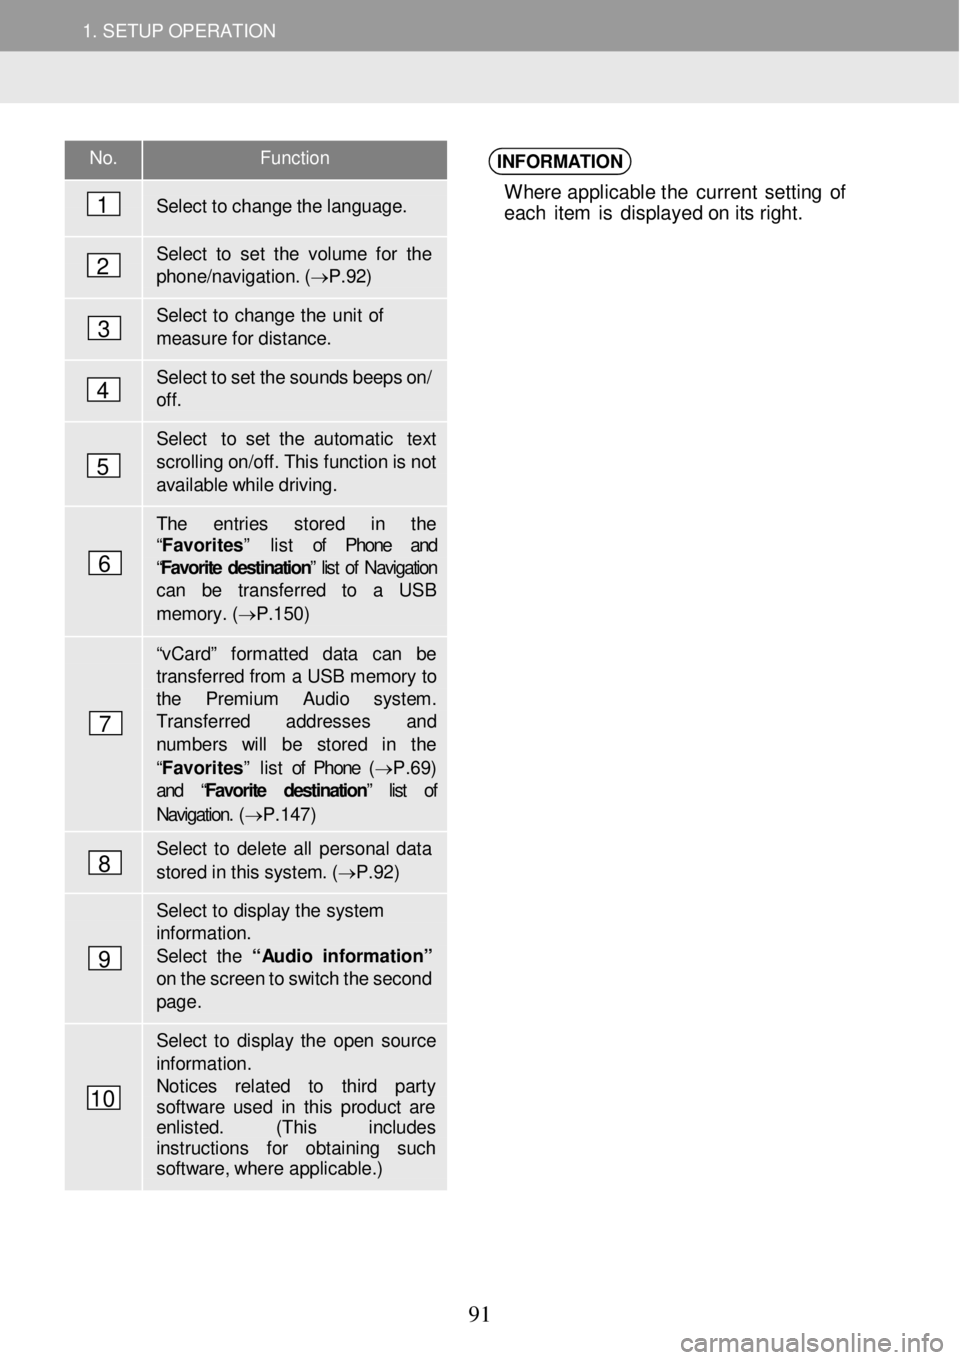
No. Function
Select to ch ange the language.
Select to set the vol ume for the phon e/navigation. ( â P.92)
Select to change the u nit of mea sure f o r dista nce.
Select to set the sounds b eeps o n/ off.
Select to set the a utomatic text
sc rolling on/of f. This functi on is n ot available while driving.
The entries s tored in the âFavoritesâ list of Phone and âFavorite destination â list of Navigation can be transfer red to a USB
memor y. ( â P.1 50)
âv Ca rdâ fo rmatted data can be transf erred from a USB memory to the Premium Audio syst em. Transfer red ad dresses and number s will be stored in the
âFavoritesâ list of Phone (â P.69) and â Favorite destinationâ list of
Navigation. ( â P.147)
Select to delet e all personal d ata
stored in this system. ( â P.92)
Select to di splay the system information. Select the â Audio in for mati onâ on the screen to switch the sec ond page .
Select to display the open so urce informat ion. Notices re lated to third party softwa re used in this p roduct ar e enlisted. (This includes instructions for obtai ning such softw are, whe re applicable.)
INFORMATION
Where applicable t he current se tting o f
eac h it e m is d isp lay ed o n i ts right.
1
2
3
4
5
6
7
8
9
10
91
Page 92 of 164
1. SETUP OPERATION 1. SETUP OPERATION
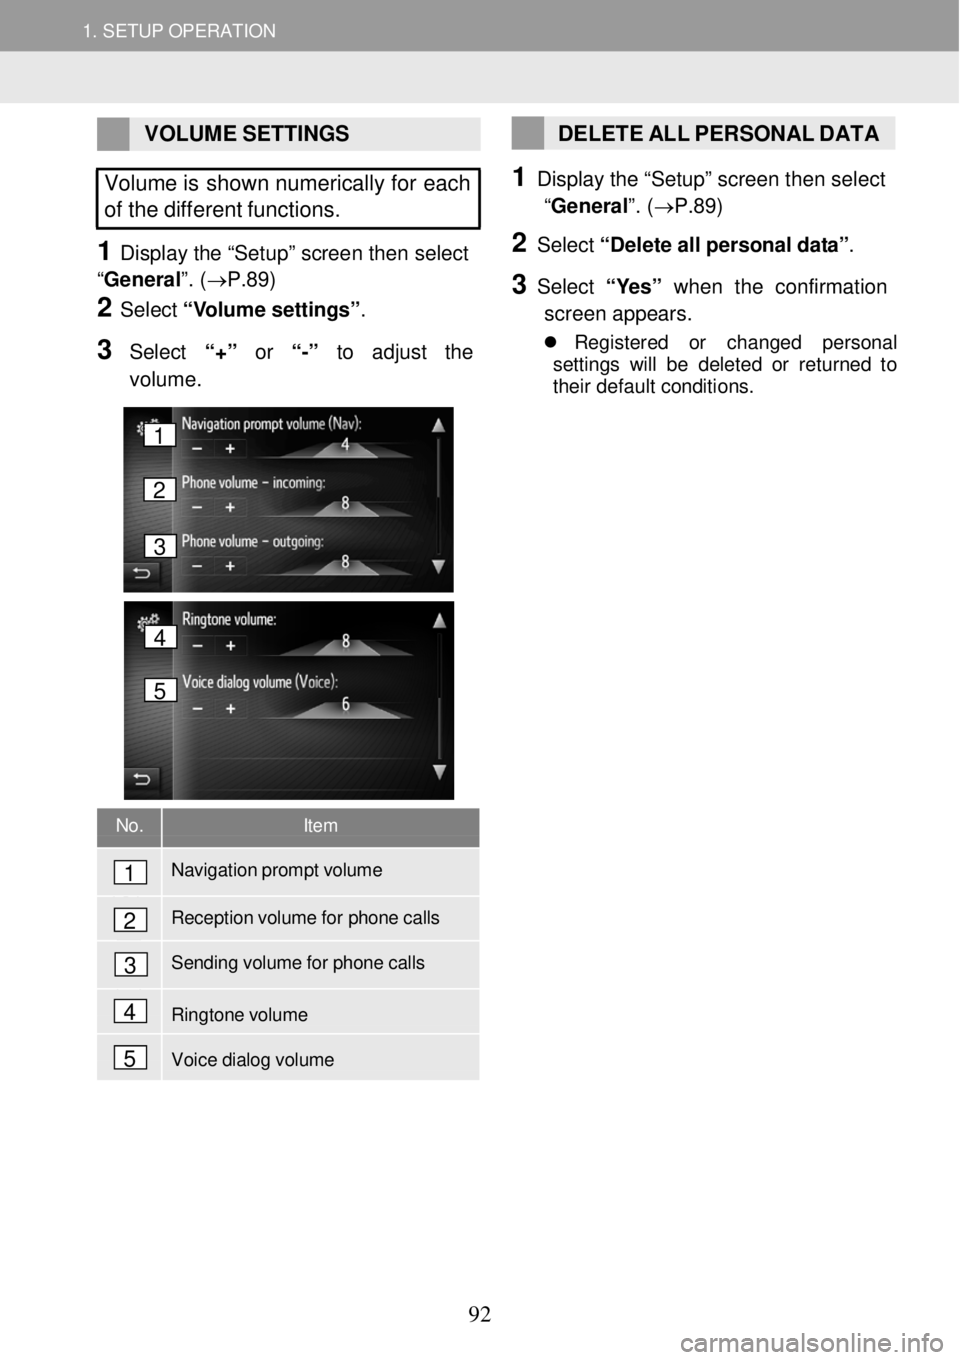
VOLUME SETTINGS
Volume is shown numerically for each
of the different functions.
1 Display the âSetu pâ scree n then select
âGeneral â. (âP.89)
2 Select âV o lume settin gsâ.
3 Select â+â or â-â to adjust the
volume.
DELETE ALL PERSONAL DATA
1 Disp lay the âSetu pâ scree n then select
âGeneral â. (âP.89)
2 Select â D ele te all pe rs o na l da ta â.
3 Select â Y esâ w hen the confirmation
scre en ap pears.
ï¬ Reg is tered or ch ange d perso nal
s et tings wi ll be de le te d o r ret urn ed to
t h ei r de fau lt co ndit ions .
No. Item
Navigation prompt volume
Reception volume for phone calls
Sending volume for phone calls
Ringtone volume
Voice dialog volume
1
2
3
4
5
4
5
1
2
3
92
Page 93 of 164
1. SETUP OPERATION 1. SETUP OPERATION
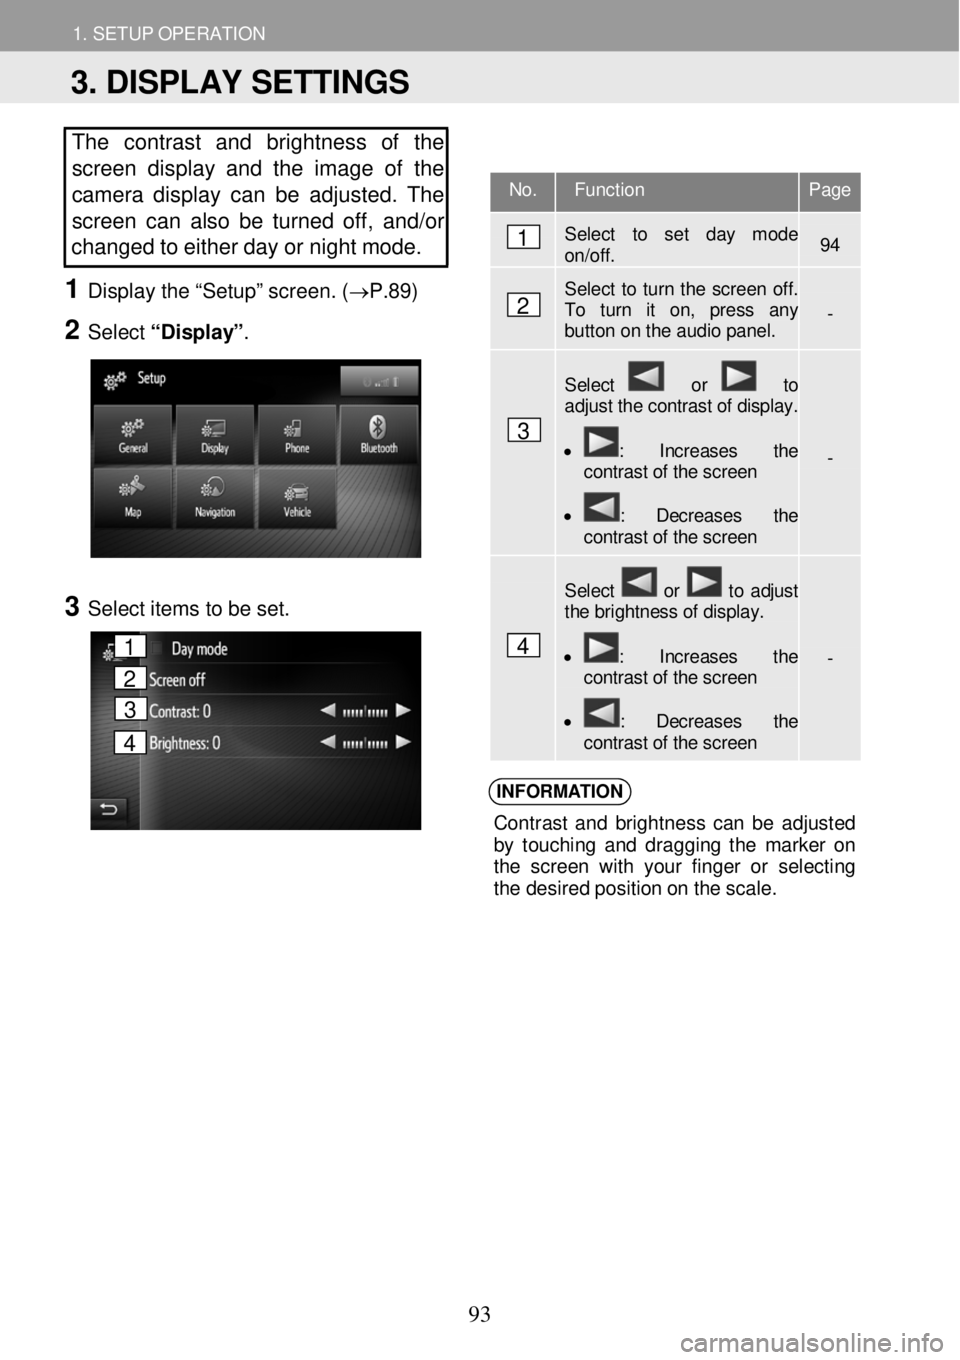
The contrast and brightness of the
screen display and the image of the
camera display can be adjusted. The
screen ca n also b e tur ned off, and/or
changed to either d ay or night mode.
1 Displ ay the âSetupâ scr een. ( âP.89)
2 Select âDisplayâ .
3 Select ite ms to be set.
INFORM ATION
Con tras t an d b righ tne ss ca n b e ad jus ted
b y to uch in g an d dragg in g th e m arke r on
t h e scre en with your fin ge r o r selecting
t h e des ired po sit io n o n t he s cal e.
No. Function Page
Select to set day mode on/off. 94
Select to turn the screen off. To turn it on, press any button on the audio panel. -
Select or to adjust the contrast of display.
⢠: Increases the contrast of the screen
⢠: Decreases the contrast of the screen
-
Select or to adjust the brightness of display.
⢠: Increases the contrast of the screen
⢠: Decreases the contrast of the screen
-
1
2
3
4
3. DISPLAY SETTINGS
1
2
3
4
93
Page 94 of 164

1. SETUP OPERATION 1. SETUP OPERATION
CHANGING BETWEEN DAY
AND NI GHT MODE
Depending on the position of the
headlight switch, the screen changes
to day or night mod e. This feature is
available when the headlight is
s witched on.
1 Display the âSetupâ screen then select
âDisplay â. (âP. 89)
2 Select âD ay m ode â.
INFORM ATION
If th e s cre en is se t to d ay mod e wi th the
head ligh t sw itc h turne d on , th is con dit ion
i s mem orize d eve n whe n th e ignition is in
t h e fo llo wi ng s ta tu s.
ïµ Ve hicl es with out a smart entry &
st art system
The eng ine swit ch is tur ned to the
âLO CKâ posit ion.
ïµ Vehicles with a smart ent ry & start
s ystem
The ignition is turn ed off.
94
Page 95 of 164
1. SETUP OPERATION 1. SETUP OPERATION
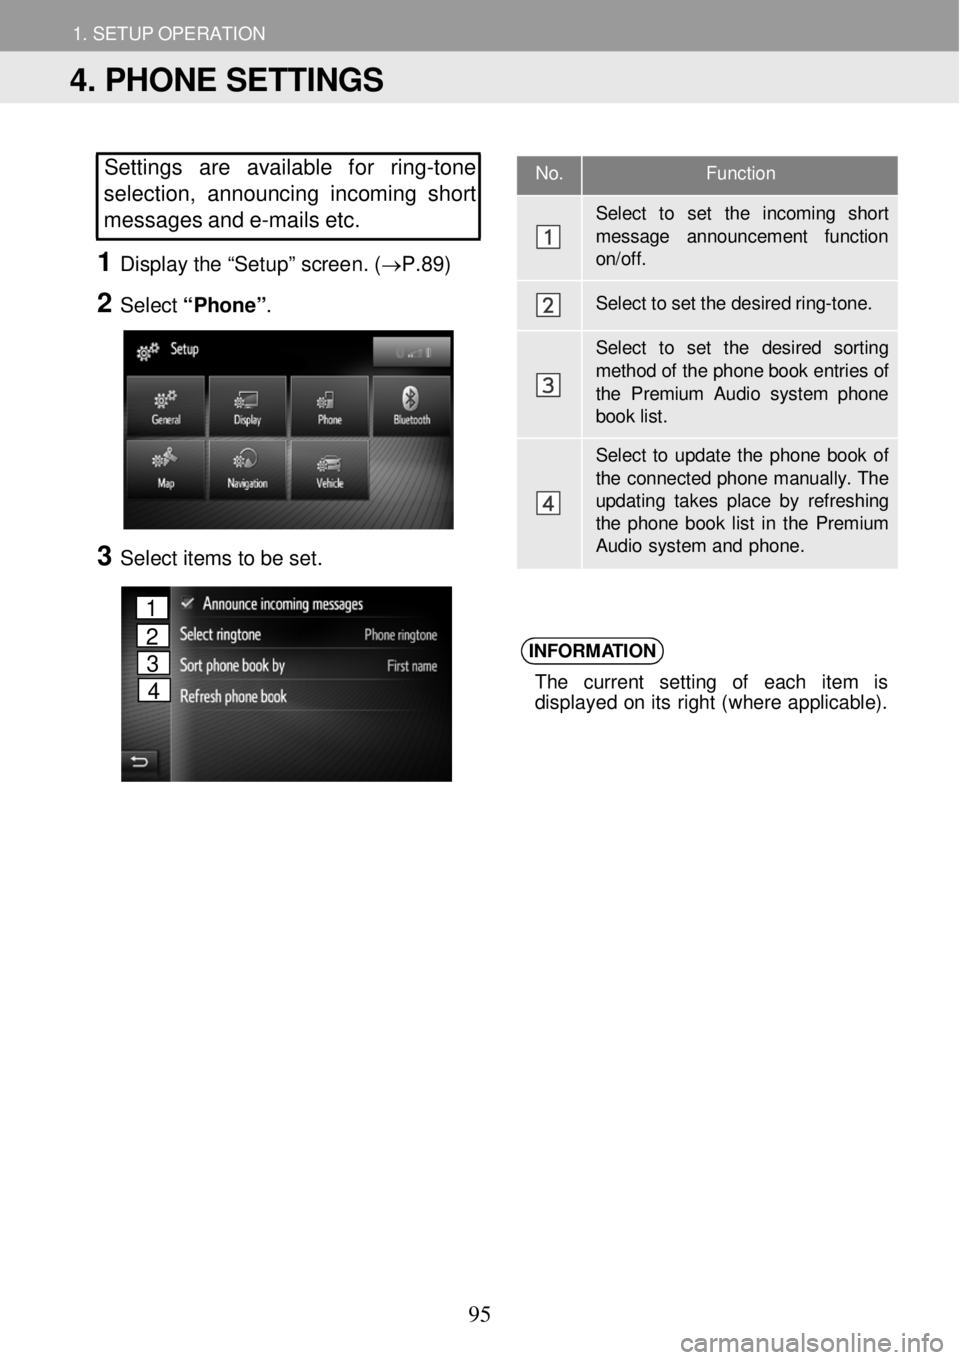
No. Function
Select to set the incoming shor t
message announcement functi on on/off.
Select to set the desired r in g-tone.
Select to set the desired sor tin g
method of the phone book entries of the Premium Audio system phon e book list.
Select to update the phone book of the connected phone manually. T he updating takes place by refreshing the phone book list in the Premium Audio system and phone.
Settings are available fo r ring -tone
selection, a nnounci ng i ncoming short
messages and e-m ails etc.
1 Disp lay the âSetu pâ scree n. (âP.89)
2 Select âPh oneâ.
4
3 Select i tems to be set.
INFORM
ATION
The cu rrent se ttin g of eac h it em is
d isp laye d o n it s r ight (wher e ap plicabl e).
4. PHONE SETTINGS
1
2
3
4
95
Page 96 of 164
1. SETUP OPERATION 1. SETUP OPERATION
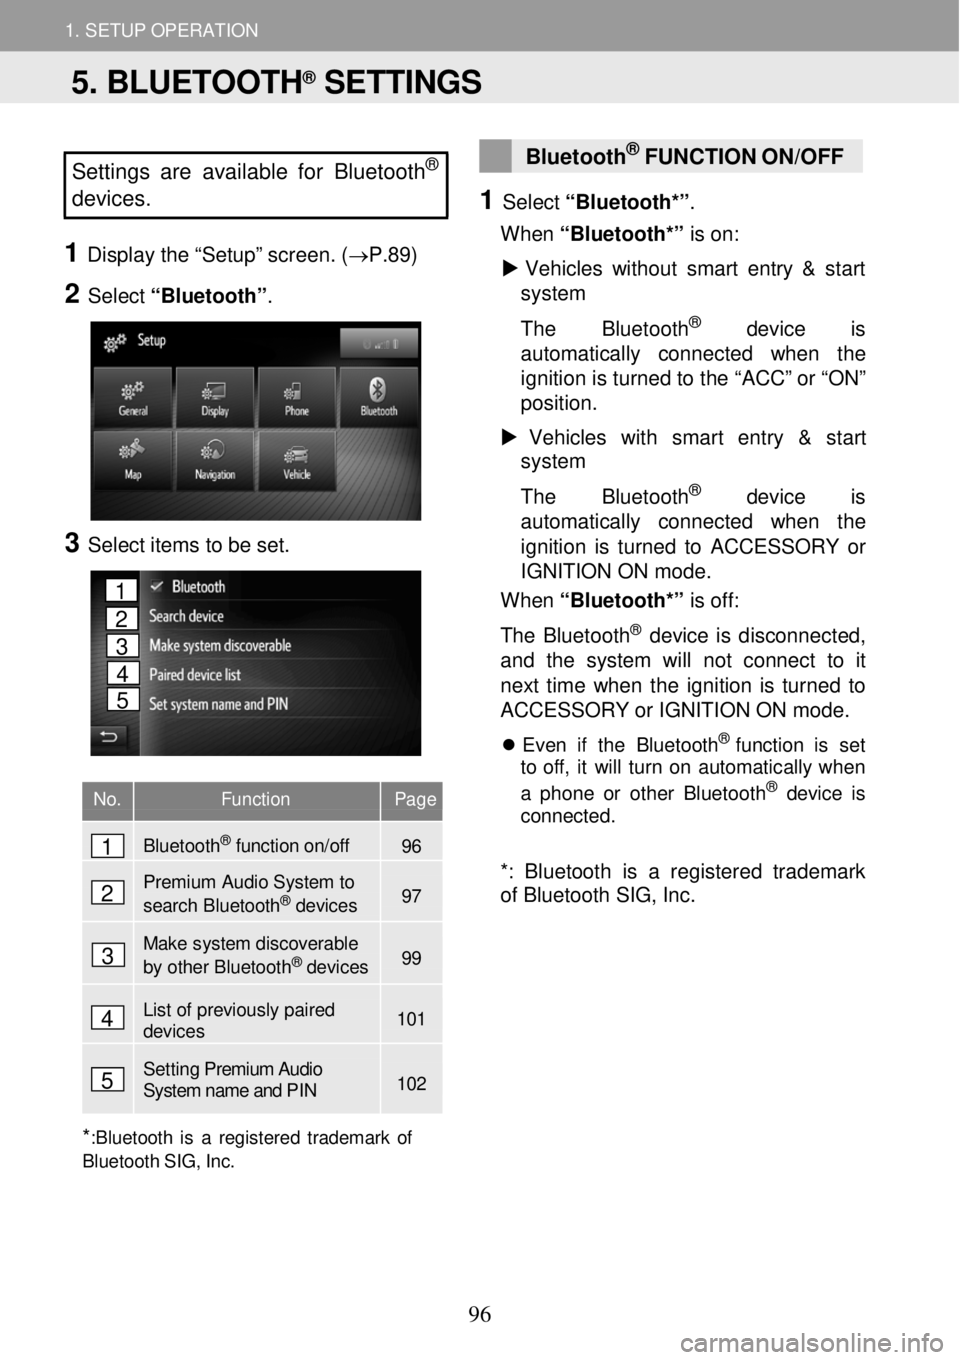
Settings are available for Bluet ooth®
devices.
1 Displ ay the âSetupâ scr een. ( âP.89)
2 Select âBluetoothâ .
3 Select ite ms to be set.
No. Function Page
Bluetooth
Page 97 of 164
1. SETUP OPERATION 1. SETUP OPERATION
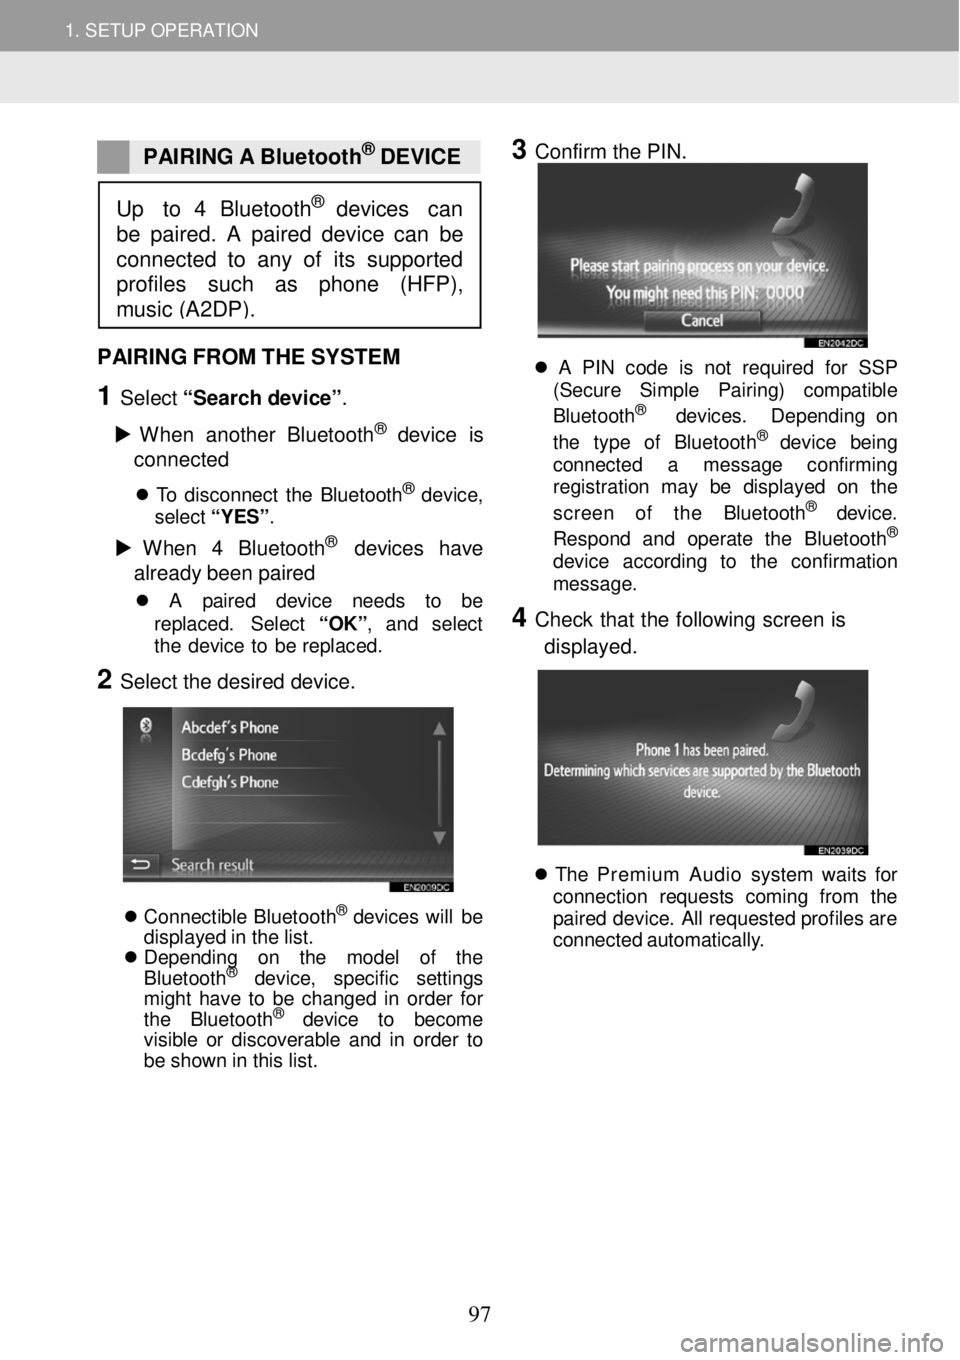
PAIRING A Bluetoot h® DEVICE
3 Confirm the PIN.
PAIRING FROM THE SYSTEM
1 Select âSear ch devi ce â.
ïµ W hen another Bl uet ooth
® device is
c o nne cted
ï¬ T o disconn ect th e Bluet ooth® dev ice,
sel ect â Y ESâ .
ïµ W hen 4 Bl ue tooth® devices have
alr ea dy b een p aire d
ï¬ A pa ir ed de vic e ne ed s to be
re pla ced. S ele ct âOK â, an d se lec t
t h e de vic e to be repl aced.
2 Select the desired device.
ï¬ Conne ctib le Blue too th® de vi ce s will be
d isp laye d in th e lis t.
ï¬ Depending on the model of the
B lue toot h
® de vi ce , specific settings
might have to be changed in order for
the Blue too th
® de vi ce to become
visible or discoverable and in order to
be shown in this list.
ï¬ A PIN code is not r eq ui re d fo r SSP
(S ecur e Simp le Pa ir ing) co m patib le
B lueto oth
® de vic es. Dep end in g on
t he typ e of Blue toot h® dev ic e bei ng
conn ect ed a messag e con firm in g
reg is tr a tion may be di spl aye d on th e
screen of the Bluet oot h
® devic e.
Respon d an d op era te the Blue tooth®
devi ce ac cordi ng to th e con firma tio n
messag e.
4 Check th at the fo llow ing screen is
d isp laye d.
ï¬ Th e Premium Audio system wa it s fo r
conn ection re que sts com in g fr om th e
p a ir e d dev ice . A ll req ues te d pro file s ar e
c onne cted a ut omat ica lly .
Up to 4 Bluetooth® devices can
be paired. A paired device can be
connected to any of its suppor ted
profiles su ch as phone (HFP),
music (A2DP).
97
Page 98 of 164
1. SETUP OPERATION ïµ
1. SETUP OPERATION
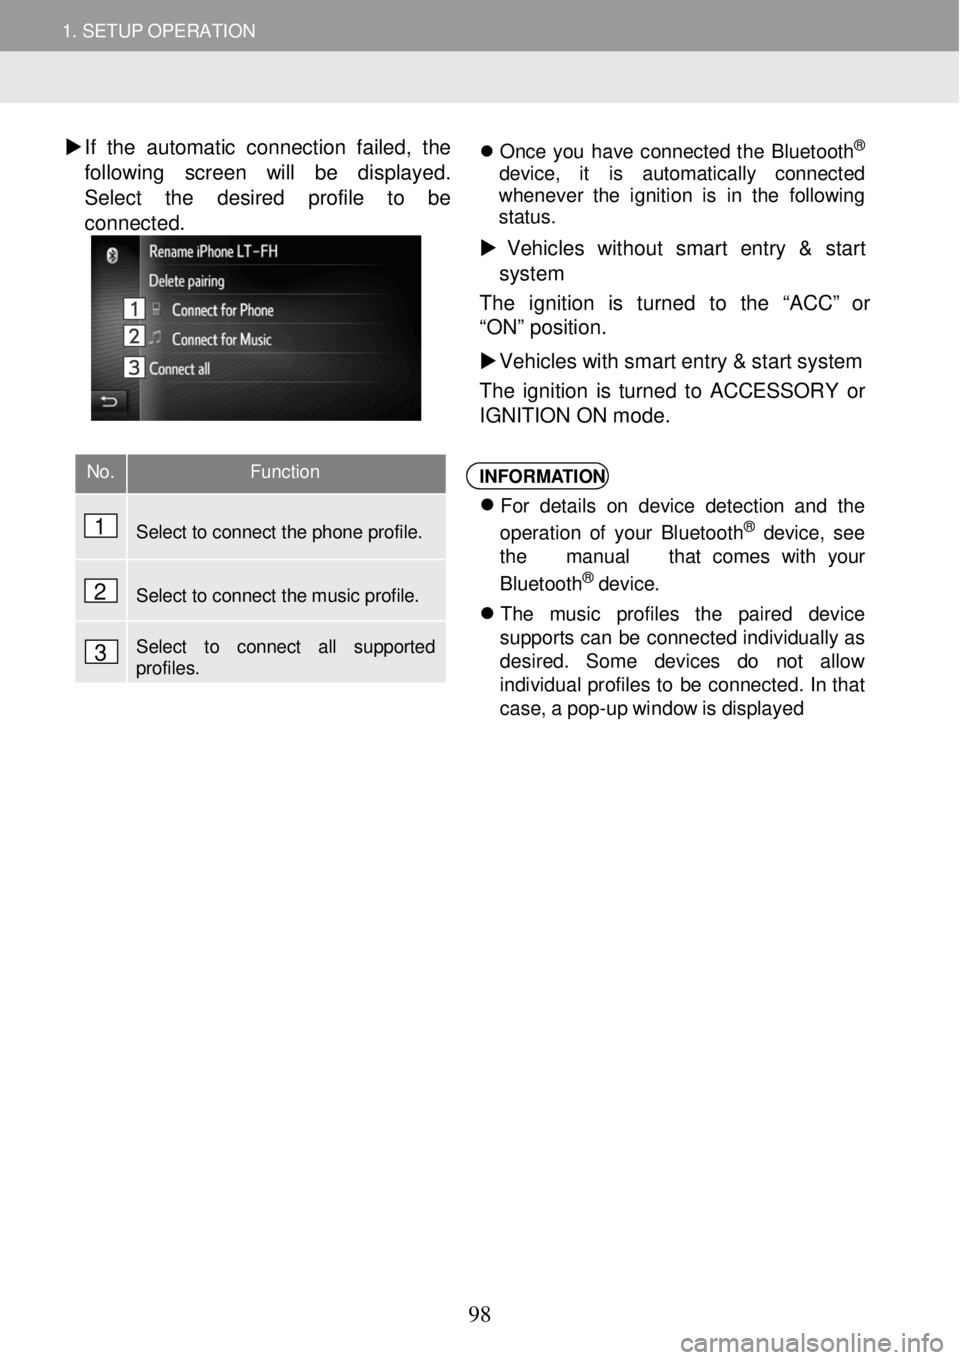
�X If th e a u tomatic co nnecti on fa iled, the
foll owing screen will be dis playe d.
Select t he desired prof ile to be
conne cted.
ï¬ On ce yo u hav e conn ecte d th e B luet ooth®
d ev ice , it is au tomat ic al ly co nnec ted
wh eneve r th e ignition is in th e fo llowi ng
st atu s.
ïµ Vehic les w ith out sma rt entry & start
sys te m
T he ignition is turned to th e âAC Câ or
âONâ pos it io n.
ïµ Vehicles with smart entry & start system
The ignition is turned to ACCESSO RY or
IGN ITI ON ON mode.
INFORM ATION
ï¬
Fo r deta ils o n de vi ce det ectio n an d the
o p erat io n o f yo ur B lue too th® devic e, see
t h e manua l tha t comes with your
B lue toot h
® de vic e.
ï¬
Th e musi c prof il e s th e pa ir ed devi ce
su ppor ts c a n b e c o nnec te d in di vid ual ly as
de sired. Some de vic es do not allow
i ndi vidua l profi les to b e co nnec ted . In tha t
c a se , a po p-u p w indo w is d isp laye d
No. Function
Select to connect the phone profile.
Select to connect the music profile.
Select to connect all supported profiles.
1
2
3
98
Page 99 of 164
1. SETUP OPERATION ïµ
1. SETUP OPERATION
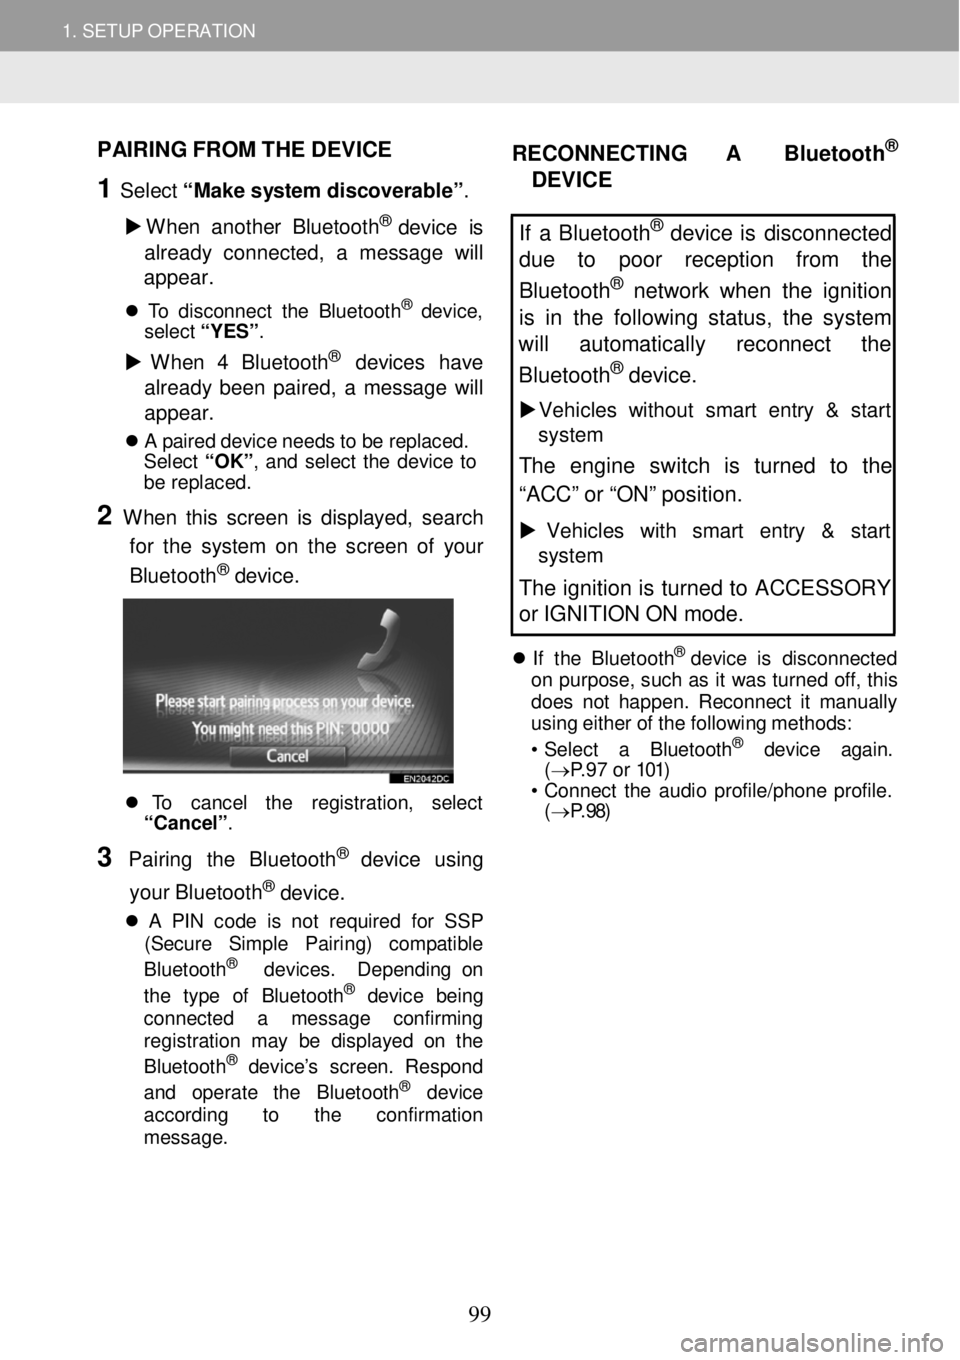
PAIRING FROM THE D EVICE
1 Select âMake sy stem discover ableâ.
ïµ W hen a nother Bl ueto oth
® device is
alre ady c onnected , a m essage wi ll
a ppe ar.
ï¬ T o disc onne ct th e Blue toot h® dev ice,
sel ect â Y ESâ .
ïµ W hen 4 Bl ue tooth® devices have
alre ady been paired, a messag e will
a ppe ar.
ï¬ A p a ir ed de vic e n e ed s t o b e re pla ced.
S ele ct âOK â, and se lec t th e dev ice to
be repl aced.
2 W hen this screen is dis played, search
for the system on th e s creen of y o ur
Bluetoo th
® device.
ï¬ To cancel th e regis tra tio n, sel ect
âCance lâ .
3 Pairi ng the B luetooth® dev ic e usi ng
your Bluetoo th
® device.
ï¬ A PIN cod e is no t req uire d for SSP
(Se cur e Simp le Pair ing ) com pat ib le
B lue toot h
® dev ices . Depe ndi ng on
t he t yp e of Bl uet ooth® de vic e bei ng
connect ed a messag e co nfirmi ng
reg istra tion may be dis play ed on th e
B lu eto oth
® dev ice âs screen. Re spon d
a nd operate the B luet ooth® dev ic e
acc ord in g to th e confir ma tio n
m essag e.
RECONNECTING A Bluetoot h®
DEVICE
If a Bluetooth® device is disconnected
due to poor reception from the
Bluetooth
® network when the ignition
is in the following status, the system
will au tomatically reconnect the
Bluetoo th
® device.
ïµ Veh icles w it h out smart entry & start
system
The engine switch is turned to the
âACCâ or âONâ position.
ïµ Vehicles with sm art entry & start
system
The ignition is turned to ACCESSORY
or IGNITION ON mode.
ï¬ If th e B lue too th® d ev ic e is disco nnec ted
o n purpo se, su ch a s it wa s turned off, th is
d o es no t h a ppen . Recon nect it ma nua lly
us in g e ither o f th e f o llowin g me th o ds:
⢠Se lec t a Bl uet ooth
® de vic e agai n.
( â P.97 or 101)
⢠C onnect th e au dio p ro file /p hone p ro file .
( â P.98)
99
Page 100 of 164
1. SETUP OPERATION 1. SETUP OPERATION
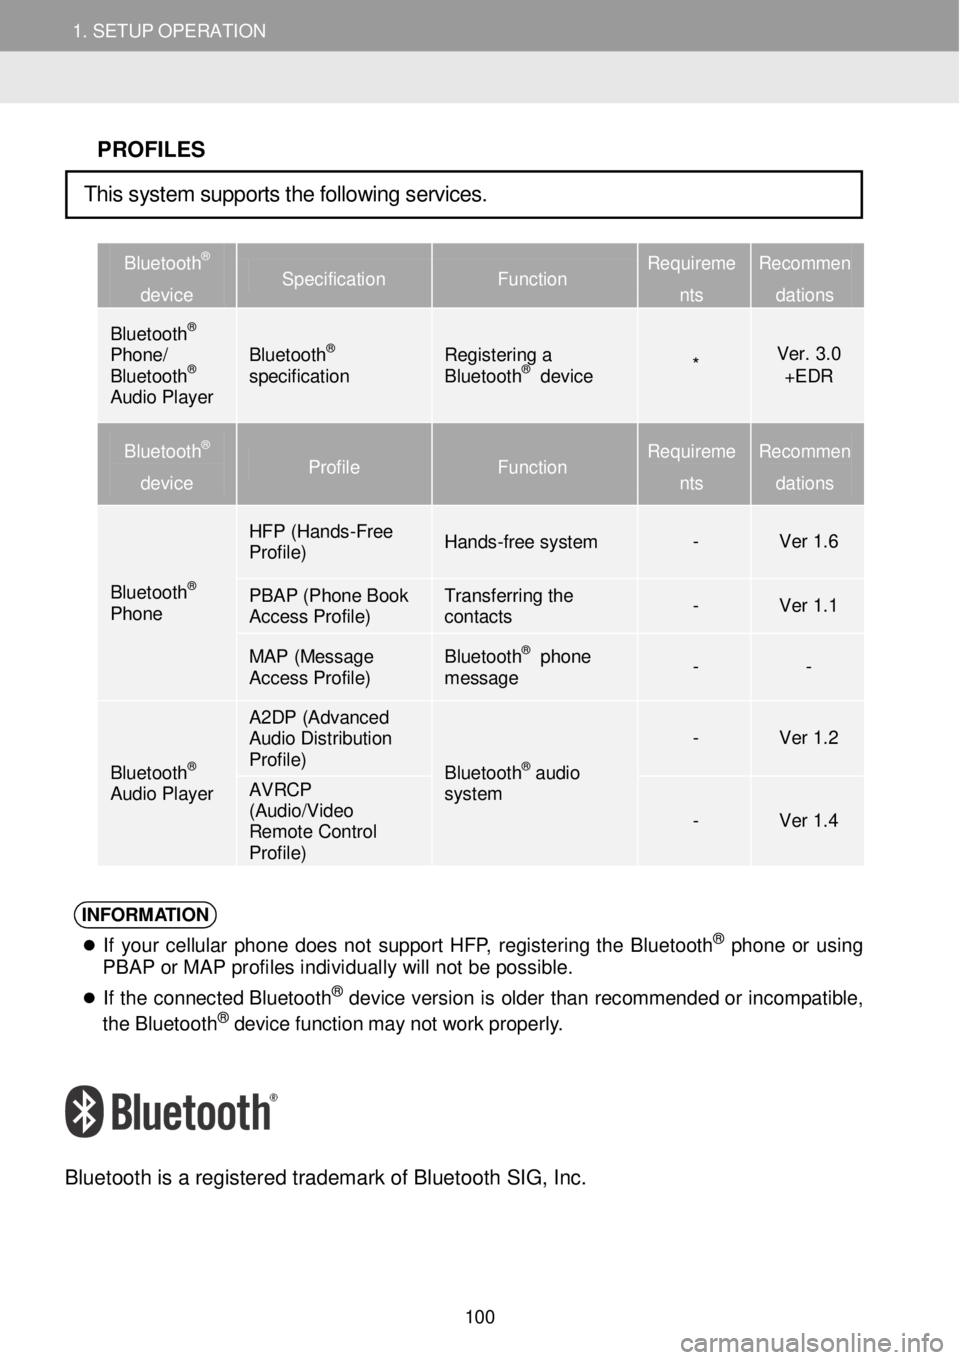
PROFILES
Bluetooth®
device Specification Function Requireme
nts
Recommen
dations
Bluetooth® Phone/ Bluetooth® Audio Player
Bluetooth® specification Registering a Bluetooth® device * Ver. 3.0 +EDR
Bluetooth®
device Profile Function Requireme
nts
Recommen
dations
Bluetooth® Phone
HFP (Hands -Free Profile) Hands-free system - Ver 1.6
PBAP (Phone Book Access Profile) Transferring the contacts - Ver 1.1
MAP (Message Access Profile) Bluetooth® phone message - -
Bluetooth® Audio Player
A2DP (Advanced Audio Distribution Profile) Bluetooth® audio system
- Ver 1.2
AVRCP (Audio/Video Remote Control Profile)
- Ver 1.4
INFORM ATION
ï¬
If your ce llu la r p h on e do es no t s uppo rt HF P, reg is tering th e Bl uet ooth® phone o r us ing
PBAP or MAP profiles individually will not be possible.
ï¬
If th e c o nnec ted Bl uet oot h® de vic e vers io n is o ld er than recomm ende d o r in com patibl e,
t h e B lue too th® de vi ce f u nct io n ma y no t w ork p ro perl y.
Bl uetooth is a re gistered tradem ark of B lueto oth SIG, Inc.
This system supports the following services.
100