DATSUN PICK-UP 1977 Service Manual
Manufacturer: DATSUN, Model Year: 1977, Model line: PICK-UP, Model: DATSUN PICK-UP 1977Pages: 537, PDF Size: 35.48 MB
Page 181 of 537
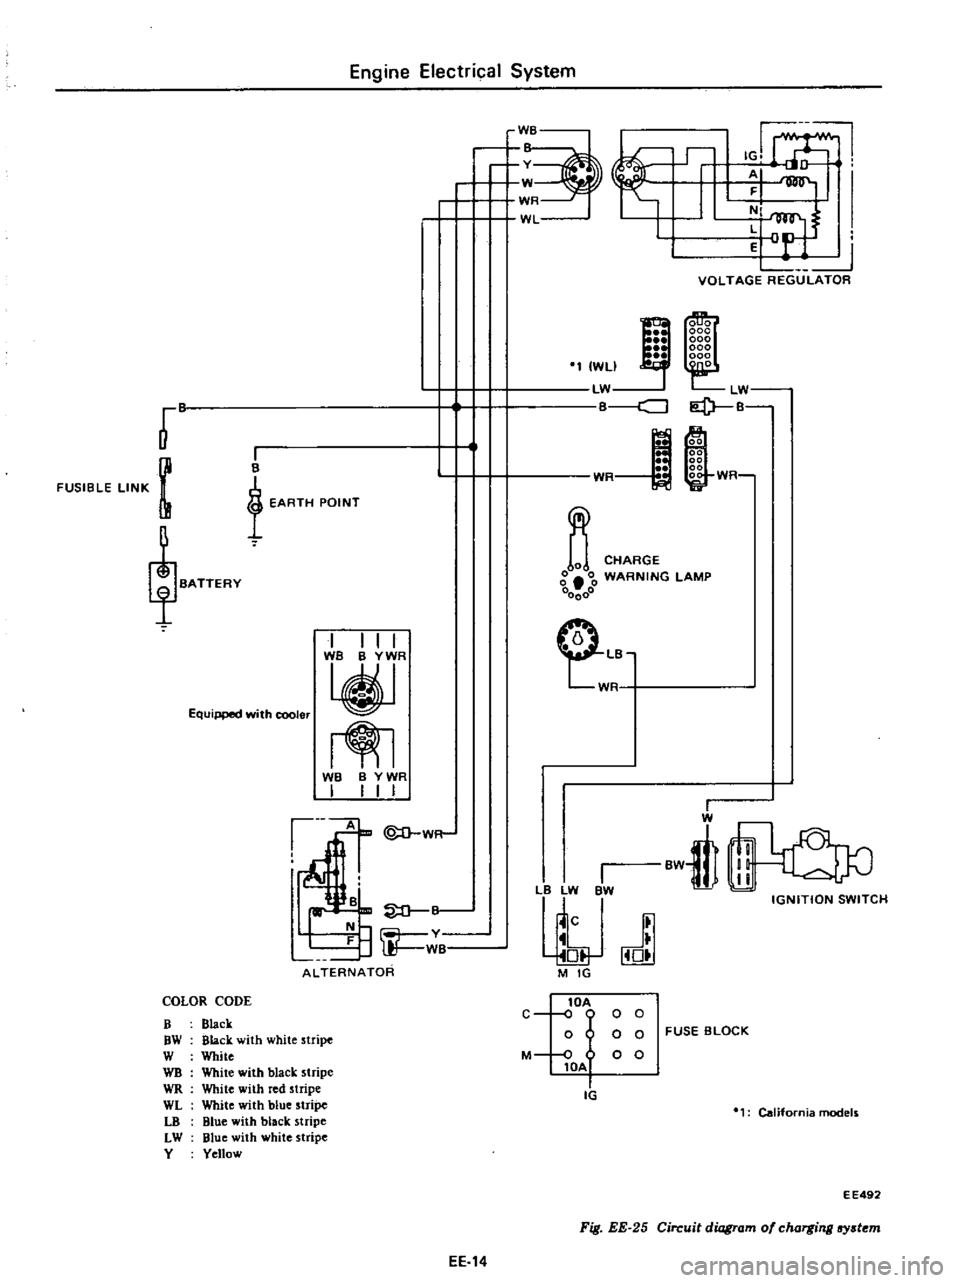
Engine
Electrical
System
B
v
W
WR
WL
L2
VOLTAGE
REGULATOR
co
LW
I
P
B
r
FUSIBLE
LINK
m
I
WLI
LW
cJ
I
B
t
EARTH
POINT
m
WR
WR
CHARGE
g
00
WARNING
lAMP
00000
Equipped
with
cooler
I
I
I
I
TjT
m
CLB
W
WB
B
YWR
I
I
I
I
1
W
B
rn
ALTERNATOR
I
l
LW
BW
j
J
M
IG
I
W
BwtIl
IGNITION
SWITCH
COLOR
CODE
B
Black
OW
Black
with
white
stripe
W
White
WB
White
with
black
stripe
WR
White
with
red
stripe
WL
White
with
blue
stripe
LO
Blue
with
black
stripe
LW
Blue
with
white
stripe
Y
Yellow
lOA
C
o
0
0
0
o
0
0
FUSE
BLOCK
M
0
0
0
lOA
Ii
California
models
E
E492
Fig
EE
25
Circuit
diagram
of
charging
lfY
t
m
EE
14
Page 182 of 537
DESCRIPTION
REMOVAL
DISASSEMBLY
INSPECTION
AND
REPAIR
ROTOR
INSPECTION
INSPECTION
OF
STATOR
DESCRIPTION
In
the
alternator
a
magnetic
field
is
produced
by
the
rotor
which
consists
of
alternator
shaft
field
coil
pole
pieces
and
slip
rings
The
slip
rings
pressed
in
the
shaft
conduct
only
a
small
field
current
Output
current
is
generated
in
the
armature
coils
located
in
the
stator
The
stator
has
three
windings
and
generates
three
phase
alternating
current
Silicon
diodes
act
@God
A
tfff
Engine
Electrical
System
ALTERNATOR
CONTENTS
EE
15
EE
16
EE
16
EE
16
EE
17
EE
17
INSPECTION
OF
DIODE
INSPECTION
OF
BRUSH
SPRING
PRESSURE
TEST
ASSEMBL
Y
ALTERNATOR
TEST
SERVICE
DATA
AND
SPECIFICATIONS
EE
17
EE
1B
EE1B
EE
1B
EE19
EE
19
like
a
one
way
valve
for
electricity
so
that
charging
current
passes
easily
but
reverse
current
is
shut
out
In
this
alternator
pack
type
silicon
di
odes
are
used
Six
diodes
three
negative
and
three
positive
are
installed
in
positive
and
negative
plates
as
an
assembly
These
diodes
are
direct
soldered
at
their
tips
and
constructed
with
posi
3
2
I
4
e
o
e
9
tive
and
negative
conjunction
They
are
mounted
on
the
two
plates
which
combine
the
function
of
heat
dissipating
plate
and
positive
negative
terminals
and
are
light
in
weight
and
easy
to
service
The
pulley
mounted
on
the
air
conditioner
models
is
different
from
that
on
the
standard
models
without
air
conditioner
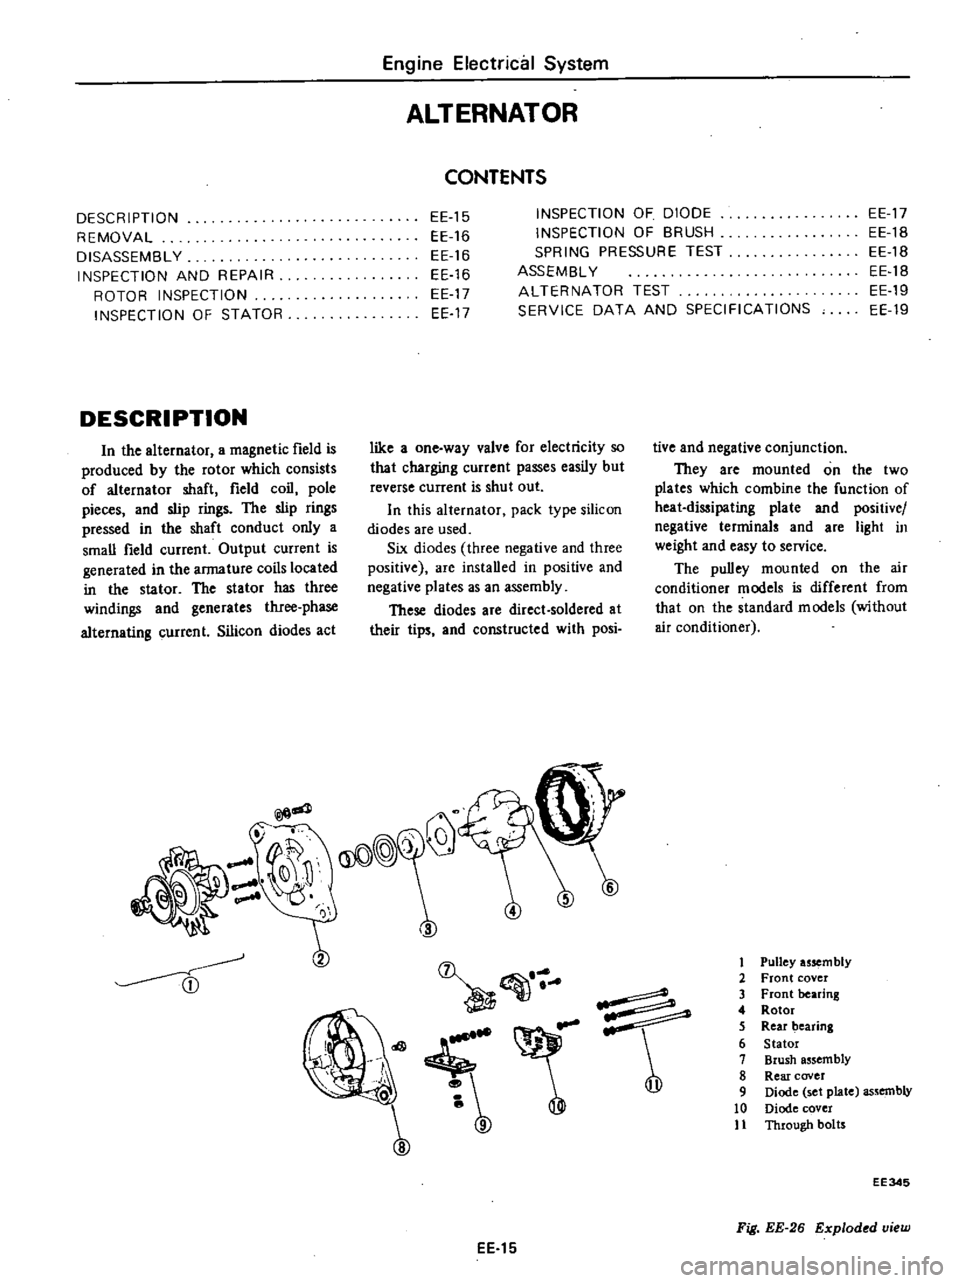
1
Pulley
usem
bly
2
Front
cover
3
Front
bearing
4
Rotor
5
Rear
bearing
6
Stator
7
Brush
assembly
8
Rear
cover
9
Diode
set
plate
assembly
10
Diode
cover
11
Through
botrs
EE
15
EE345
Fig
EE
26
Exploded
view
Page 183 of 537

REMOVAL
1
Disconnect
negative
battery
ter
minaL
2
Disconnect
two
lead
wires
and
connector
from
alternator
3
loosen
adjusting
bolt
4
Remove
alternator
drive
belt
5
Remove
parts
associated
with
alternator
from
engine
6
Remove
alternator
from
vehicle
DISASSEMBLY
1
Remove
pulley
nut
and
pulley
assembly
11
C
@@@
EE033
Fig
EE
27
Removing
pulley
ond
fan
2
Remove
brush
holder
fIxing
screws
and
remove
brush
holder
cover
Pull
brush
holder
fOIWard
and
remove
brushes
together
with
brush
holder
Note
Do
not
disconnect
N
tenninaJ
from
stator
coil
lead
wire
EE346
1
N
terminal
2
Brush
holder
3
Brush
holder
co
r
Fig
EE
28
Remouing
brush
Engine
Electrical
System
3
Remove
through
bolts
Separate
front
cover
with
rotor
from
rear
cover
with
stator
by
lightly
tapping
front
bracket
with
a
wooden
mallet
J
J
4
C
EE035
Fig
EE
29
Separating
front
cover
with
rotor
from
rear
cover
4
Remove
three
set
screws
from
bearing
retainer
and
separate
rotor
from
front
cover
DO
Q
EE036
Fig
EE
3D
Removing
rotor
5
Pull
rear
bearing
out
from
rotor
assembly
with
a
press
or
bearing
puller
L
I
EE037
Fig
EE
3I
Pulling
out
of
roar
bearing
EE
16
6
Remove
diode
cover
fIXing
screw
and
remove
diode
cover
Disconnect
three
stator
coil
lead
wires
from
diode
terminal
with
a
soldering
iron
7
Remove
A
tenninaJ
nut
and
diode
installation
nut
and
remove
diode
assembly
CD
AJ
f
e
ecA
O
1
Diode
assembly
o
2
Diode
cover
o
EE039
Fig
EE
32
Removing
diode
088embly
Note
Use
care
in
assembly
to
on
it
handling
diode
an
undue
st
INSPECTION
AND
REPAIR
Remove
alternator
from
car
and
connect
a
circuit
tester
between
F
tenninal
and
E
terminal
When
the
resistance
is
approxi
mately
5il
the
condition
of
brush
and
fIeld
coil
is
satisfactory
When
no
continuity
exists
in
brush
or
fIeld
coil
or
when
resistance
differs
significantly
between
those
parts
dis
assemble
and
inspect
A
o
E
O
1
ld
Q
EE040
Fig
EE
33
Inspecting
alternator
Page 184 of 537

ROTOR
INSPECTION
1
Continuity
test
of
rotor
coil
Apply
tester
between
slip
rings
of
rotor
as
shown
in
Figure
EE
34
If
there
is
no
continuity
field
coil
is
open
Replace
rotor
assembly
EE041
Fig
EE
34
Continuity
test
of
rotor
coil
2
Ground
test
of
rotor
coil
Check
continuity
between
slip
ring
and
rotor
core
If
continuity
exists
replace
rotor
assembly
because
rotor
coil
or
slip
ring
may
be
grounded
Fig
EE
35
Testing
rotor
coil
for
round
INSPECTION
OF
STATOR
1
Continuity
test
Stator
is
normal
when
there
is
continuity
between
individual
stator
coil
tenninals
When
there
is
no
conti
nuity
between
individual
terminals
cable
is
broken
Replace
with
stator
assembly
EE043
Fig
EE
36
Testing
stator
for
continuity
Engine
Electrical
System
2
Ground
test
If
each
lead
wire
of
stator
coil
including
neutral
wire
is
not
conduc
tive
with
stator
core
condition
is
satisfactory
If
there
is
continuity
stator
coil
is
grounded
EE045
Stator
core
Fig
EE
37
Ee044
Teding
stator
for
P
Ound
Conductive
direction
I
Diode
installed
on
EEl
plate
is
a
positive
diode
which
allows
current
flowing
from
terminal
to
EEl
plate
only
In
other
words
current
does
not
flow
from
EEl
plate
to
terminal
v
1
ptate
2
Terminal
EE046
INSPECTION
OF
DIODE
Perform
a
continuity
test
on
diodes
in
both
directions
using
an
ohmmeter
A
total
of
six
diodes
are
used
three
are
mounted
on
the
positive
EEl
plate
and
other
three
are
on
the
negative
e
plate
The
continuity
test
should
be
performed
on
each
diode
between
the
terminal
and
plate
I
plate
2
ptate
3
Diode
Fig
EE
38
Conductive
direction
of
diode
Diode
installed
on
e
plate
is
a
negative
diode
which
allows
current
flowing
from
e
plate
to
terminal
only
In
other
words
current
does
not
flow
from
terminal
to
e
plate
I
plate
2
Terminal
EE047
Fig
EE
39
Inspecting
positive
diode
Fig
EE
40
Insp
cting
negative
diode
EE
17
Page 185 of 537

If
current
flows
in
both
positive
and
negative
directions
diode
is
short
circuited
If
current
flows
in
one
direc
tion
only
diode
is
in
good
condition
Test
probe
of
a
circuit
t
ter
e
Gl
terminal
EEl
plate
EJ
plate
terminal
terminal
e
plate
e
plate
terminal
e
plate
@
plate
Xl
plate
e
plate
INSPECTION
OF
BRUSH
Check
movement
of
brush
and
if
movement
is
not
smooth
check
brush
holder
and
clean
if
necessary
Check
brush
for
wear
If
it
is
worn
down
to
less
than
the
specified
limit
replace
brush
assembly
Check
brush
pig
tail
and
if
dam
aged
replace
Brush
wear
limiting
line
EE127
Fig
EE
41
Bnlsh
wear
limil
Engine
Electrical
System
If
there
is
a
faulty
diode
replace
all
diodes
ix
diode
as
an
assembly
See
table
below
These
diodes
are
unserviceable
Conduction
o
o
o
SPRING
PRESSURE
TEST
With
brush
projected
approximate
ly
2
mm
0
079
in
from
brush
holder
measure
brush
spring
pressure
by
the
use
of
a
pring
balance
Normally
the
rated
pressure
of
a
new
brush
spring
is
255
to
345
gr
9
0
to
12
202
Morevover
when
brush
is
worn
pressure
decrease
approximately
20
g
0
7
02
per
1
mm
0
0039
in
wear
t
m
0
079
in
or
f
EEO
9
Fig
EE
42
M
CJ
uring
pring
preaure
EE
lB
ASSEMBLY
Reassemble
alternator
in
the
reverse
sequence
of
disassembly
noting
the
following
I
When
soldering
each
stator
coil
lead
wire
to
diode
assembly
terminal
carry
out
the
operation
as
fast
as
pas
sible
2
When
installing
diode
A
terminal
install
insulating
bush
correctly
1
Imulating
bush
2
A
terminal
bolt
3
Diode
cover
4
Rear
cover
5
Diode
a
sembly
EE347
Fig
EE
43
Sectional
view
of
diode
and
A
term
inal
3
Tighten
pulley
nut
with
tighten
ing
torque
of
3
5
to
4
0
kg
m
25
3
to
29
0
ft
Ib
When
pulley
is
tightened
make
sure
that
deflection
of
V
groove
is
less
than
0
3
mm
0
01
IS
in
q
ffl
t
EE051
Fig
EE
44
Tightening
pulley
nut
Page 186 of 537

Engine
Electrical
System
ALTERNATOR
TEST
Before
conducting
an
alternator
test
make
sure
th
tthe
battery
is
fully
charged
A
30
V
olt
voltmeter
and
suitable
test
probes
3re
necessary
for
the
test
Set
up
a
test
circuit
as
shown
in
Figure
EE45
and
test
auernator
in
the
manner
indica
ted
in
the
flow
chart
below
1
Disconnect
connectors
at
alternator
2
Connect
A
terminal
to
F
terminal
3
Connect
one
test
probe
from
voltmeter
positive
terminal
to
A
terminal
Connect
the
other
test
probe
to
ground
Make
sure
that
voltmeter
registers
battery
voltage
4
Turn
on
headlights
and
switch
to
High
Beam
5
Start
engine
6
Increase
engine
speed
gradually
until
it
is
approximately
1
100
rpm
and
take
the
voltmeter
reading
Measured
value
Below
12
5
Volts
Alternator
is
in
trouble
remove
and
check
it
for
condition
Measured
value
Over
12
5
Volts
Alternator
is
in
good
condition
Notes
a
Do
Dot
run
engine
at
the
speed
of
more
than
1
100
rpm
while
test
is
being
conducted
on
alternator
b
Do
not
race
engine
i
9
l
IV
I
Battery
EE052
Voltmeter
Fig
EE
45
Testing
alternator
SERVICE
DATA
AND
SPECIFICATIONS
Nominal
rating
V
A
LT138
IB
LTl35
36B
For
air
conditioner
1235
12
38
Negative
Negative
1
000
1
000
28
2
500
30
2
500
35
5
000
38
5
000
2
25
2
25
More
than
7
5
0
295
More
than
7
5
0
295
255
to
345
255
to
345
9
0
to
12
2
9
0
to
12
2
More
than
30
1
181
More
than
30
1
181
EE
19
Type
Ground
polarity
Minimum
revolution
when
generating
14V
with
no
load
rpm
Hot
output
current
Nrpm
Pulley
ratio
Brush
Length
Spring
pressure
mm
in
gr
oz
Slip
ring
outer
diameter
mm
in
Page 187 of 537

DESCRIPTION
MEASUREMENT
OF
REGULATOR
VOLTAGE
ADJUSTMENT
VOLTAGE
REGULATOR
DESCRIPTION
The
regulator
consists
basically
of
a
voltage
regulator
and
a
charge
relay
The
voltage
regulator
has
two
sets
of
contact
points
a
lower
set
and
an
upper
set
to
control
alternator
volt
age
An
armature
plate
placed
between
the
two
sets
of
contacts
moves
upward
or
downward
or
vibrates
The
lower
contacts
when
closed
complete
the
jCV
ID@
@
GJ
I
@
@
@
Engine
Electrical
System
REGULATOR
CONTENTS
EE
20
CHARGING
RELAY
SERVICE
DATA
AND
SPECIFICATIONS
TROUBLE
DIAGNOSES
AND
CORRECTIONS
Including
alternatorl
EE
25
EE
23
EE
24
EE
20
EE
23
EE
23
field
circuit
direct
to
ground
and
the
upper
contacts
when
closed
complete
the
field
circuit
to
ground
through
a
resistance
field
coil
and
produce
alternator
output
The
charge
relay
i
similar
in
construction
to
the
voltage
regulator
When
the
upper
contacts
are
closed
charge
warning
lamp
goes
on
v
1
Charge
relay
2
Voltage
regulator
EE285
Fig
EE
46
View
of
removing
cover
As
regards
the
construction
the
voltage
regulator
is
very
similar
to
the
charge
relay
as
shown
in
Figure
EE47
@
r
J
CD
@
@
@
Q
@
ID@
ID@
J
t
L
T
@
r
b
r
CD
L
@
j
1
g
f
@
@
EEJ97
J
I1Jlccting
spring
2
Y
kt
g
p
3
Armaturc
4
Core
go
5
Low
Sllccd
lnlacl
h
Point
ap
7
High
speed
conlat
t
8
Contact
c
9
3111111
0
118
ill
di
10
41l1I11W
157in
c1ia
few
II
Cuil
12
lock
nut
J3
Adjllslin
screw
14
Adjll
sting
sprin
15
Yoke
9
Adjusting
screw
10
Lock
nut
11
Coil
12
4mm
0
157
in
dia
screw
13
3mm
0
118
in
dla
crew
14
Contact
iet
15
Voltage
cgulatm
contact
a
Cnl1
Tlll
tion
f
lltagl
l
j
llIOltllT
I
Point
gilp
2
Charge
relay
contllct
3
Core
gap
4
ArlllatlJre
5
Connecting
sprin
6
Yoke
gap
7
Yoh
B
Adjusting
pring
b
Construction
of
charge
relay
Fig
EE
47
Structural
vi
w
EE
20
Page 188 of 537
MEASUREMENT
OF
REGULATOR
VOLTAGE
Regulator
voltage
is
measured
with
regulator
assembled
with
alternator
When
measuring
voltage
with
regulator
mounted
on
car
it
is
necessary
to
rotate
engine
at
high
speed
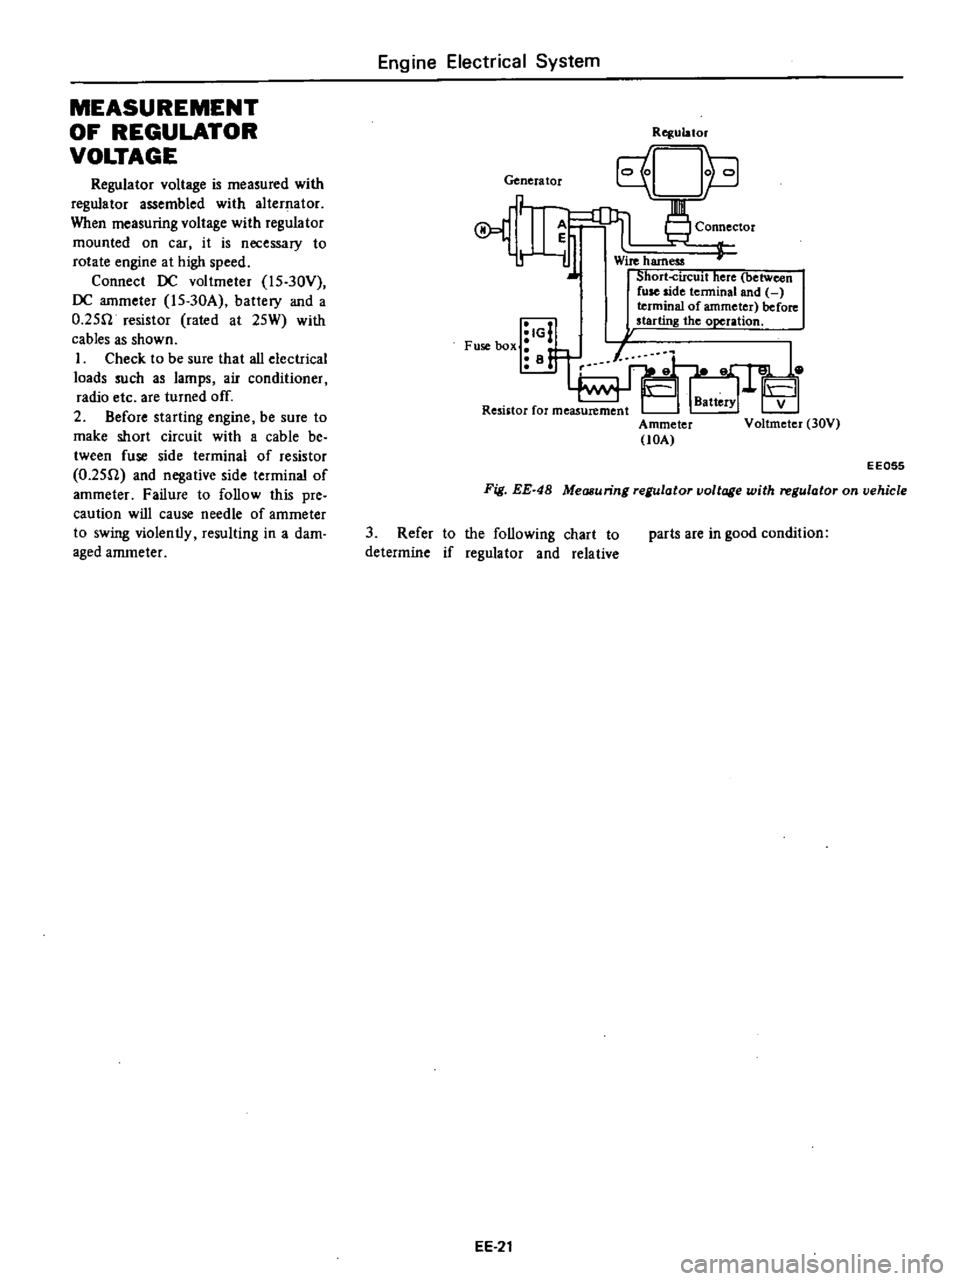
Connect
DC
voltmeter
l5
30Y
DC
ammeter
l5
30A
battery
and
a
O
25fl
resistor
rated
at
25W
with
cables
as
shown
I
Check
to
be
sure
that
all
electrical
loads
such
as
lamps
air
conditioner
radio
etc
are
turned
off
2
Before
starting
engine
be
sure
to
make
short
circuit
with
a
cable
be
tween
fuse
side
terminal
of
resistor
O
25fl
and
negative
side
terminal
of
ammeter
Failure
to
follow
this
pre
caution
will
cause
needle
of
ammeter
to
swing
violently
resulting
in
a
dam
aged
ammeter
Engine
Electrical
System
Genera
tor
A
r
iJ
IG
Fuse
box
i
B
Rqulator
Connector
Wire
harness
Short
circuit
here
between
fuse
side
tenninal
and
terminal
of
ammeter
before
starting
the
operation
Ammeter
lOA
V
Voltmeter
30V
EE055
Fig
EE
48
Measuring
regulator
voltage
with
regulator
on
vehicle
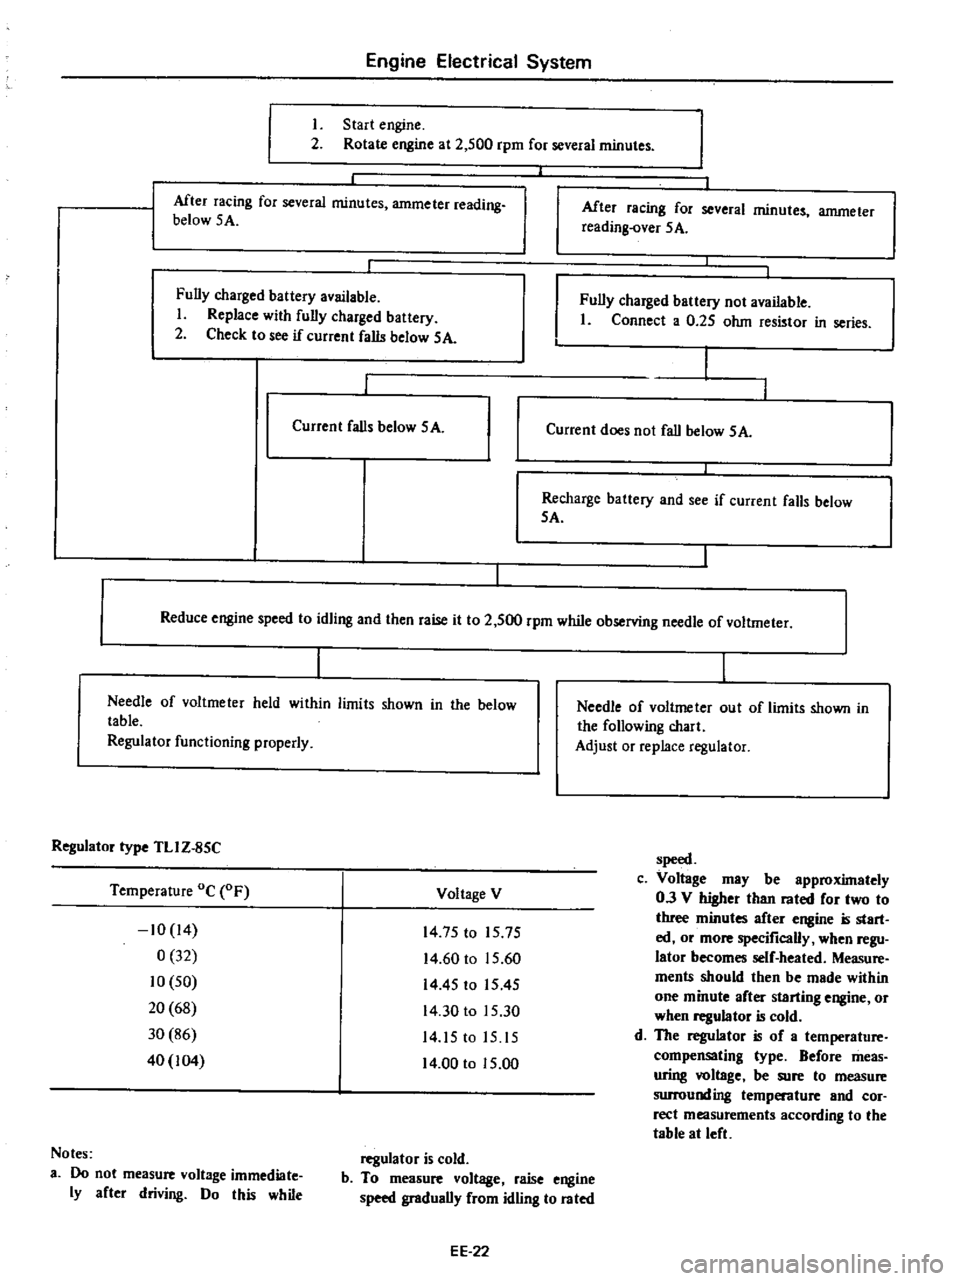
3
Refer
to
the
following
chart
to
determine
if
regulator
and
relative
EE
21
parts
are
in
good
condition
Page 189 of 537
Engine
Electrical
System
I
Start
engine
2
Rotate
engine
at
2
500
rpm
for
several
minutes
Mter
racing
for
several
minutes
ammeter
reading
below
SA
After
racing
for
several
minutes
ammeter
reading
over
5
A
Fully
charged
battery
available
I
Replace
with
fully
charged
battery
2
Check
to
see
if
current
falls
below
SA
Fully
charged
battery
not
available
I
Connect
a
0
25
ohm
resistor
in
series
Current
falls
below
SA
Current
does
not
fall
below
SA
Recharge
battery
and
see
if
current
falls
below
SA
Reduce
engine
speed
to
idling
and
then
raise
it
to
2
500
rpm
while
observing
needle
of
voltmeter
Needle
of
voltmeter
held
within
limits
shown
in
the
below
table
Regulator
functioning
properly
Needle
of
voltme
ter
ou
t
of
limits
shown
in
the
following
chart
Adjust
or
replace
regulator
Regulator
type
TLI
Z
85C
Temperature
Oc
OF
Voltage
V
speed
c
Voltage
may
be
approximately
0
3
V
higher
than
rated
for
two
to
three
minutes
after
engine
is
start
ed
or
more
specifically
when
regu
lator
becomes
self
heated
Measure
ments
should
then
be
made
within
one
minute
after
starting
engine
or
when
regulator
is
cold
d
The
regulator
is
of
a
temperature
compensating
type
Before
meas
uring
voltage
be
sure
to
measure
surrounding
temperature
and
cor
rect
measurements
according
to
the
table
at
left
10
14
0
32
10
50
20
68
30
86
40
104
14
75
to
15
75
14
60
to
15
60
14
45
to
1545
14
30
to
15
30
14
15
to
15
15
14
00
to
15
00
Notes
3
Do
not
measure
voltage
immediate
ly
after
driving
Do
this
while
regulator
is
cold
b
To
measure
voltage
raise
engine
speed
gradually
from
idling
to
rated
EE
22
Page 190 of 537
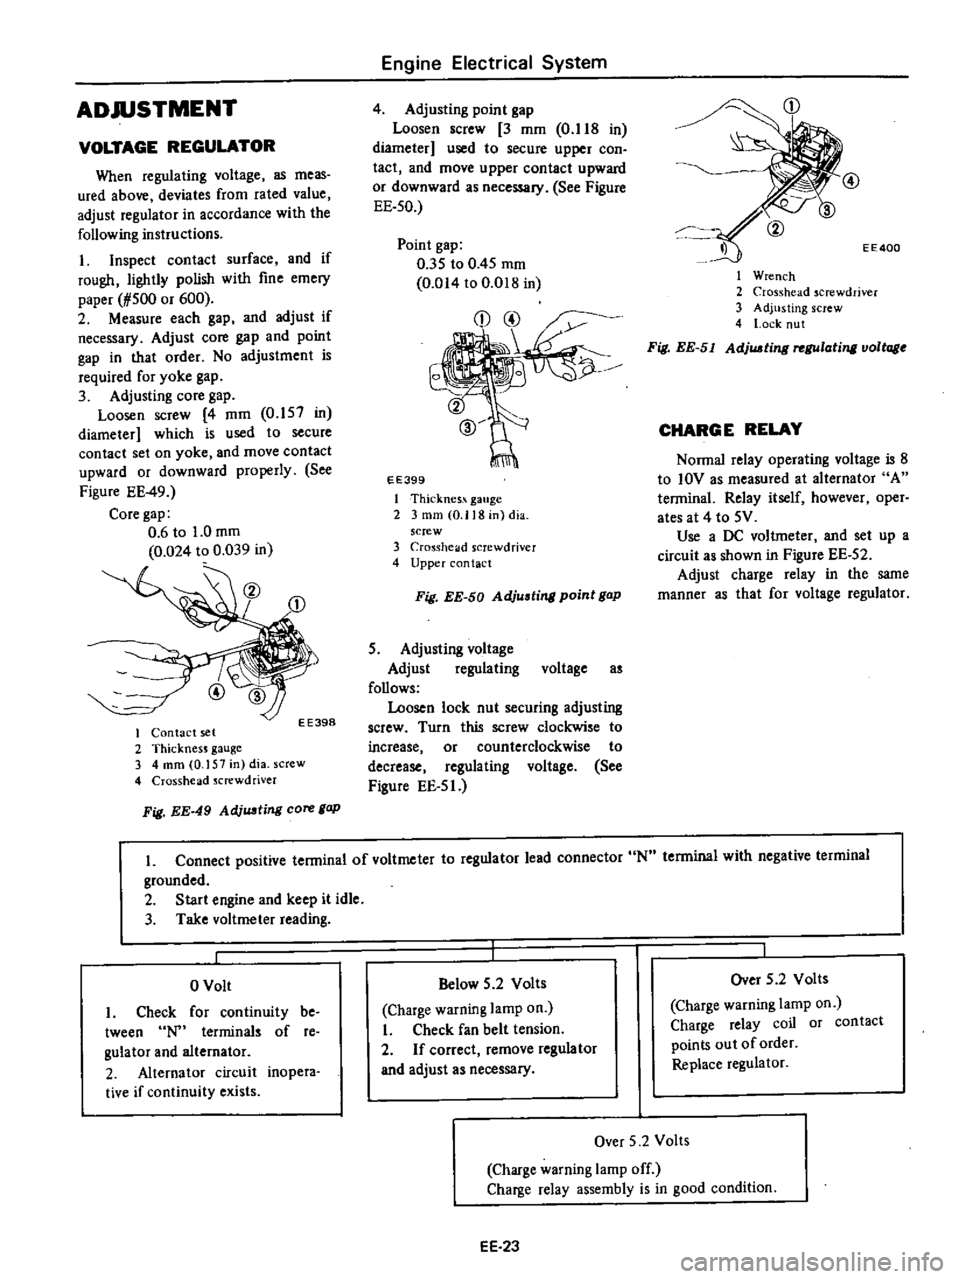
ADJUSTMENT
VOLTAGE
REGULATOR
When
regulating
voltage
as
meas
ured
above
deviates
from
rated
value
adjust
regulator
in
accordance
with
the
following
instructions
I
Inspect
contact
surface
and
if
rough
lightly
polish
with
fine
emery
paper
1
500
or
600
2
Measure
each
gap
and
adjust
if
necessary
Adjust
core
gap
and
point
gap
in
that
order
No
adjustment
is
required
for
yoke
gap
3
Adjusting
core
gap
Loosen
screw
4
mm
0
157
in
diameter
which
is
used
to
secure
contact
set
on
yoke
and
move
contact
upward
or
downward
properly
See
Figure
EE
49
Core
gap
0
6
to
1
0
mm
0
024
to
0
039
in
EE398
I
Contact
set
2
ThicknesJ
gauge
3
4
mm
0
157
in
dia
screw
4
Crosshead
Jcrewdriver
Fig
EE
49
AdjUJJting
core
gap
Engine
Electrical
System
4
Adjusting
point
gap
Loosen
screw
3
mm
O
lIS
in
diameter
used
to
secure
upper
con
tact
and
move
upper
contact
upward
or
downward
as
necessary
See
Figure
EE
50
Point
gap
035
to
0
45
mm
0
014
to
O
D1S
in
EE399
I
Thicknes
gauge
2
3
mm
0
118
in
dia
screw
3
Cro
Sshelld
screwdriver
4
Upper
contact
Fig
EE
50
Adjusting
point
gap
5
Adjusting
voltage
Adjust
regulating
voltage
as
follows
Loosen
lock
nut
securing
adjusting
screw
Turn
this
screw
clockwise
to
increase
or
counterclockwise
to
decrease
regulating
voltage
See
Figure
EE
5
J
CD
EE400
I
Wrench
2
Crosshead
screwdriver
3
Adjusting
screw
4
l
ock
nut
Fig
EE
51
AdjUJJting
rel
Ulating
voltage
CHARGE
RELAY
Nonna
relay
operating
voltage
is
S
to
IOV
as
measured
at
alternator
A
tenninal
Relay
itself
however
oper
ates
at
4
to
5V
Use
a
DC
voltmeter
and
set
up
a
circuit
as
shown
in
Figure
EE
52
Adjust
charge
relay
in
the
same
manner
as
that
for
voltage
regulator
L
Connect
positive
tenninal
of
voltmeter
to
regulator
lead
connector
N
tenninal
with
negative
terminal
grounded
2
Start
engine
and
keep
it
idle
3
Take
voltmeter
reading
o
Volt
I
Check
for
continuity
be
tween
terminals
of
re
gulator
and
alternator
2
Alternator
circuit
inopera
tive
if
continuity
exists
Below
5
2
Volts
Charge
warning
lamp
on
I
Check
fan
belt
tension
2
If
correct
remove
regulator
and
adjust
as
necessary
Over
5
2
Volts
Charge
warning
lamp
on
Charge
relay
coil
or
contact
points
out
of
order
Replace
regulator
Over
5
2
Volts
Charge
warning
lamp
off
Charge
relay
assembly
is
in
good
condition
EE
23