NISSAN X-TRAIL 2003 Electronic Repair Manual
Manufacturer: NISSAN, Model Year: 2003, Model line: X-TRAIL, Model: NISSAN X-TRAIL 2003Pages: 3066, PDF Size: 51.47 MB
Page 2801 of 3066
NOISE, VIBRATION, AND HARSHNESS (NVH) TROUBLESHOOTING
RAX-5
C
E
F
G
H
I
J
K
L
MA
B
RAX
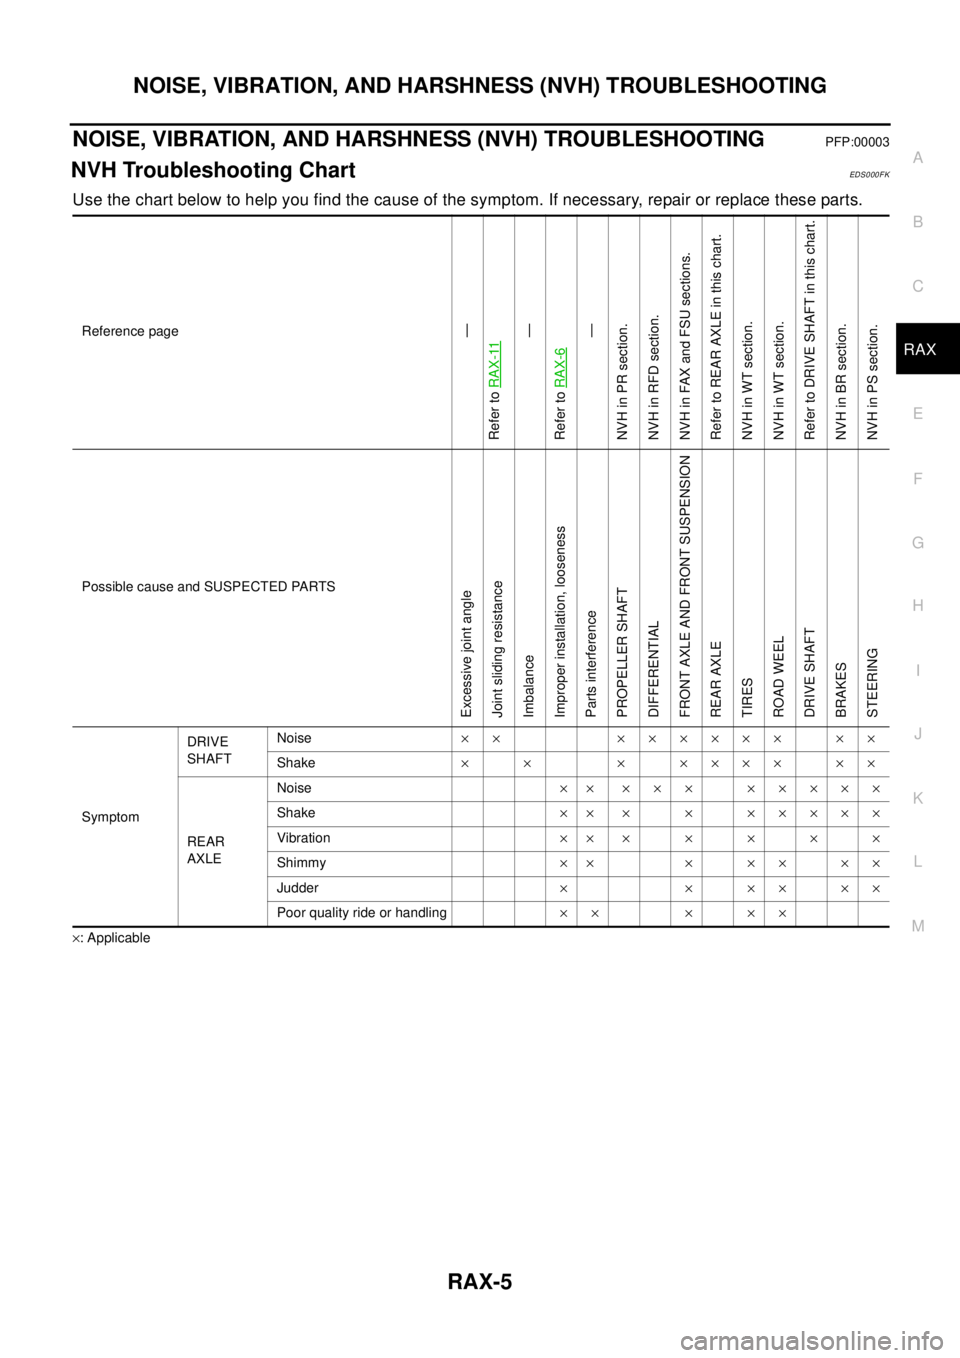
NOISE, VIBRATION, AND HARSHNESS (NVH) TROUBLESHOOTINGPFP:00003
NVH Troubleshooting ChartEDS0 00 F K
Use the chart below to help you find the cause of the symptom. If necessary, repair or replace these parts.
´: ApplicableReference page
—
Refer toRAX-11—
Refer toRAX-6—
NVHinPRsection.
NVH in RFD section.
NVHinFAXandFSUsections.
Refer to REAR AXLE in this chart.
NVH in WT section.
NVH in WT section.
Refer to DRIVE SHAFT in this chart.
NVHinBRsection.
NVH in PS section.
Possible cause and SUSPECTED PARTS
Excessive joint angle
Joint sliding resistance
Imbalance
Improper installation, looseness
Parts interference
PROPELLER SHAFT
DIFFERENTIAL
FRONT AXLE AND FRONT SUSPENSION
REAR AXLE
TIRES
ROAD WEEL
DRIVE SHAFT
BRAKES
STEERING
SymptomDRIVE
SHAFTNoise´´ ´´´´´´ ´´
Shake´´ ´´´´´´´
REAR
AXLENoise´´ ´´´ ´´´´´
Shake´´ ´ ´ ´´´´´
Vibration´´´´´´´
Shimmy´´ ´´´´´
Judder´ ´ ´´ ´´
Poor quality ride or handling´´ ´ ´´
Page 2802 of 3066
RAX-6
WHEEL HUB (4WD)
WHEEL HUB (4WD)
PFP:43202
On-Vehicle InspectionEDS00065
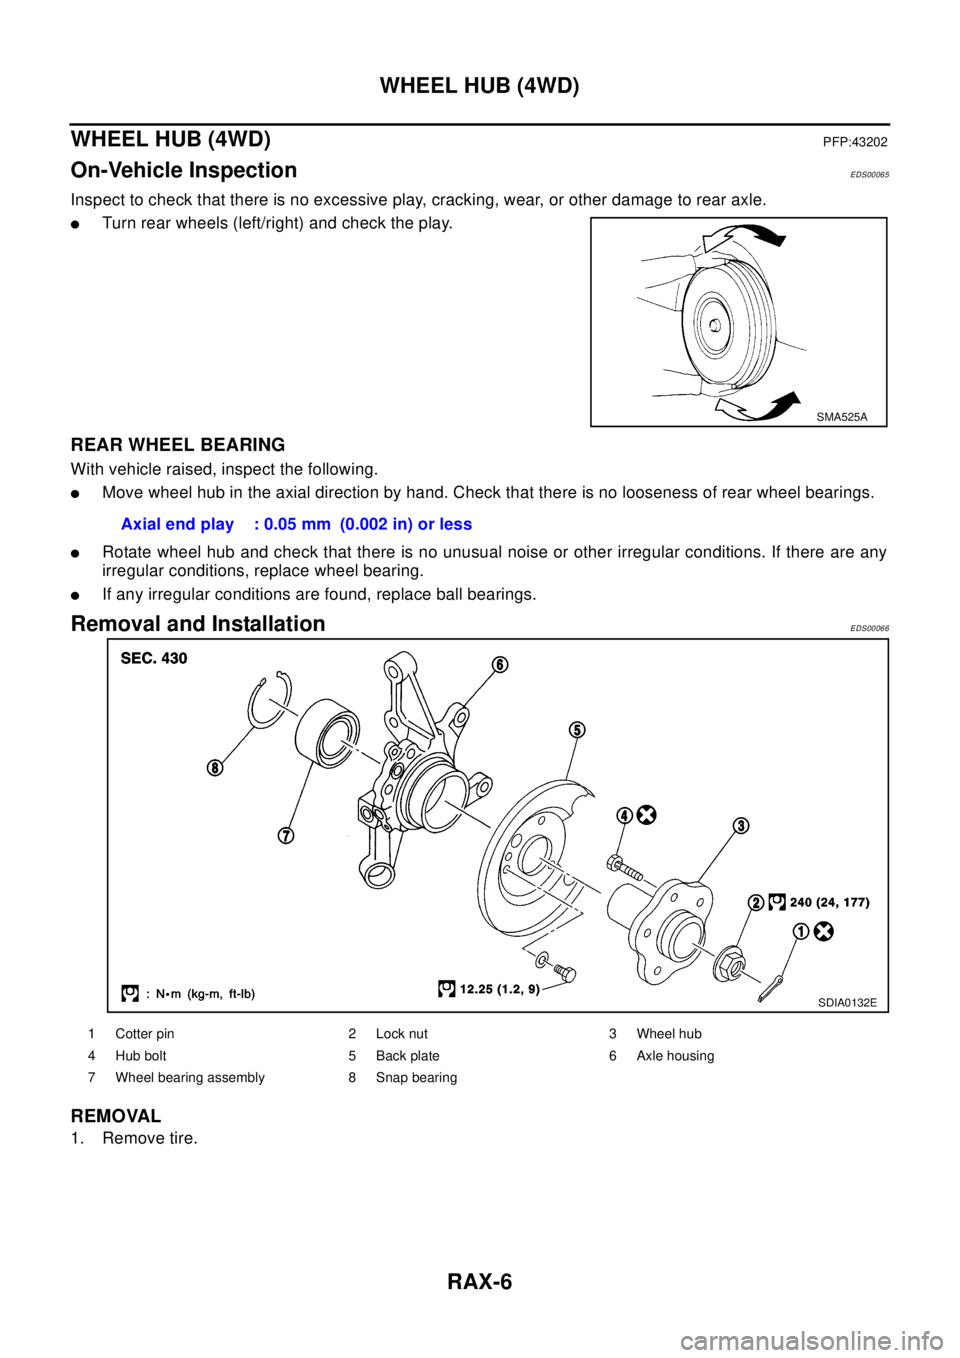
Inspect to check that there is no excessive play, cracking, wear, or other damage to rear axle.
lTurn rear wheels (left/right) and check the play.
REAR WHEEL BEARING
With vehicle raised, inspect the following.
lMove wheel hub in the axial direction by hand. Check that there is no looseness of rear wheel bearings.
lRotate wheel hub and check that there is no unusual noise or other irregular conditions. If there are any
irregular conditions, replace wheel bearing.
lIf any irregular conditions are found, replace ball bearings.
Removal and InstallationEDS00066
REMOVAL
1. Remove tire.
SMA525A
Axial end play : 0.05 mm (0.002 in) or less
SDIA0132E
1 Cotter pin 2 Lock nut 3 Wheel hub
4 Hub bolt 5 Back plate 6 Axle housing
7 Wheel bearing assembly 8 Snap bearing
Page 2803 of 3066
WHEEL HUB (4WD)
RAX-7
C
E
F
G
H
I
J
K
L
MA
B
RAX
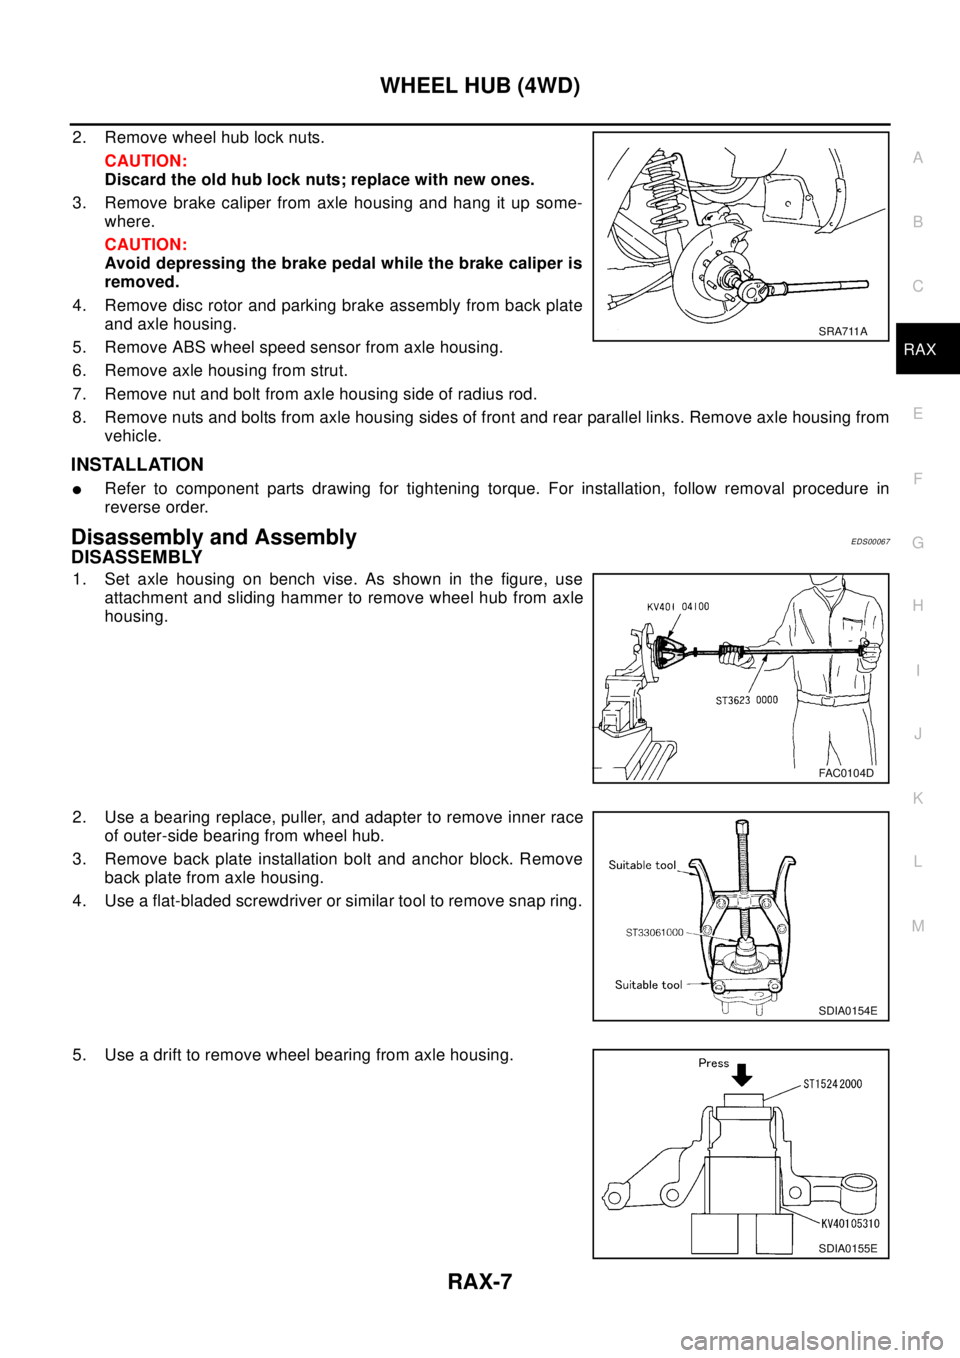
2. Remove wheel hub lock nuts.
CAUTION:
Discard the old hub lock nuts; replace with new ones.
3. Remove brake caliper from axle housing and hang it up some-
where.
CAUTION:
Avoid depressing the brake pedal while the brake caliper is
removed.
4. Remove disc rotor and parking brake assembly from back plate
andaxlehousing.
5. Remove ABS wheel speed sensor from axle housing.
6. Remove axle housing from strut.
7. Remove nut and bolt from axle housing side of radius rod.
8. Remove nuts and bolts from axle housing sides of front and rear parallel links. Remove axle housing from
vehicle.
INSTALLATION
lRefer to component parts drawing for tightening torque. For installation, follow removal procedure in
reverse order.
Disassembly and AssemblyEDS00067
DISASSEMBLY
1. Set axle housing on bench vise. As shown in the figure, use
attachment and sliding hammer to remove wheel hub from axle
housing.
2. Use a bearing replace, puller, and adapter to remove inner race
of outer-side bearing from wheel hub.
3. Remove back plate installation bolt and anchor block. Remove
back plate from axle housing.
4. Use a flat-bladed screwdriver or similar tool to remove snap ring.
5. Use a drift to remove wheel bearing from axle housing.
SRA711A
FAC0104D
SDIA0154E
SDIA0155E
Page 2804 of 3066
RAX-8
WHEEL HUB (4WD)
INSPECTION AFTER DISASSEMBLY
Wheel Hub
lInspect wheel hub for deformation, cracks, and other damage. If any irregular conditions are found,
replace wheel hub.
Axle Housing
lInspect axle housing for deformation, cracks, and other damage. If any irregular conditions are found,
replace axle housing.
Snap Ring
lCheck snap ring for deformation, cracks, and other damage. If any irregular conditions are found, replace
snap ring.
ASSEMBLY
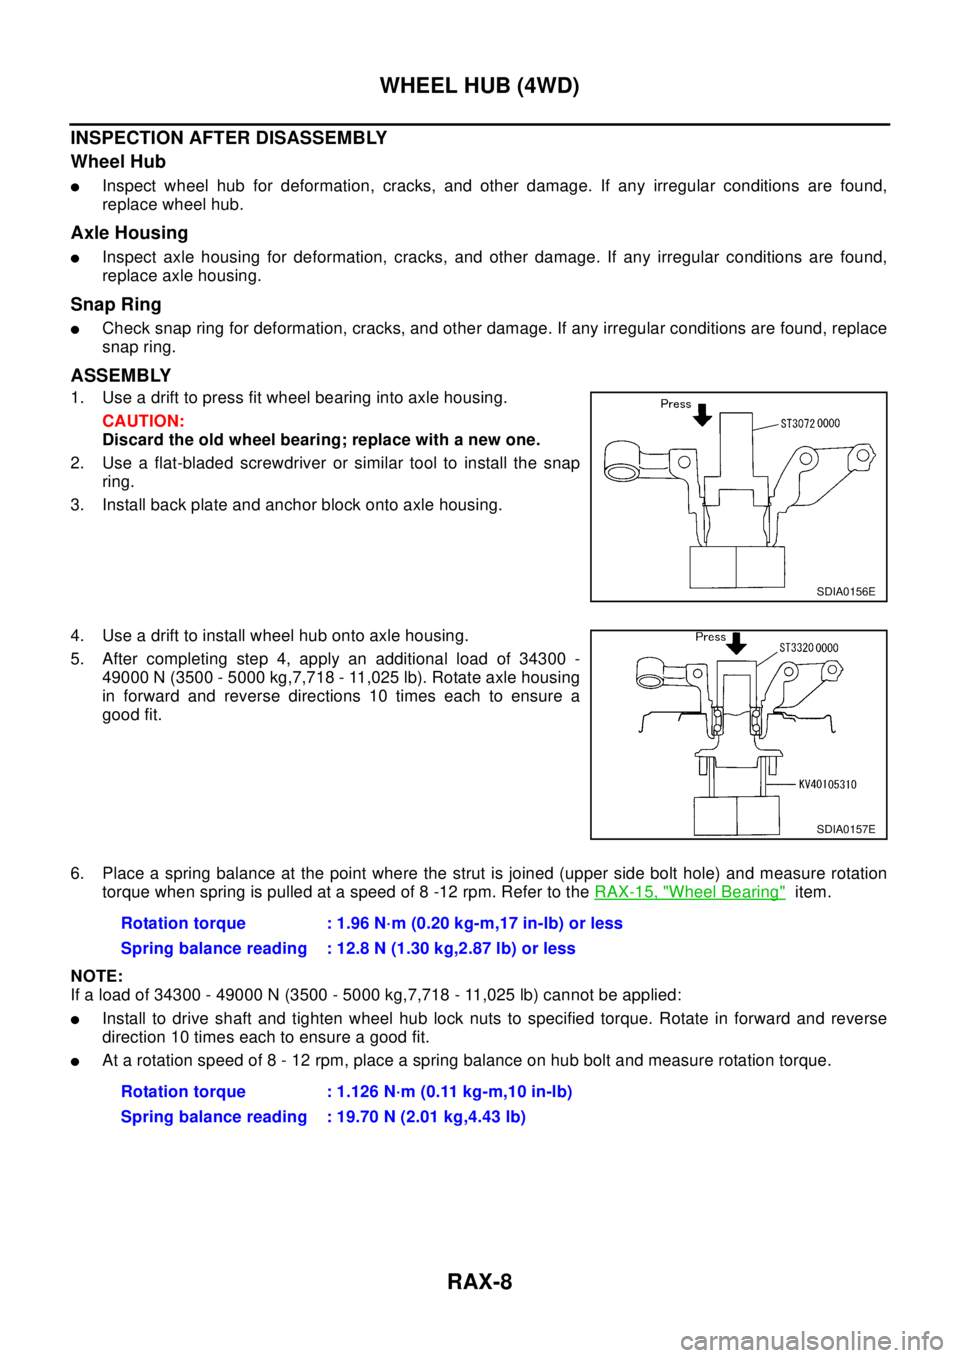
1. Use a drift to press fit wheel bearing into axle housing.
CAUTION:
Discard the old wheel bearing; replace with a new one.
2. Use a flat-bladed screwdriver or similar tool to install the snap
ring.
3. Install back plate and anchor block onto axle housing.
4. Use a drift to install wheel hub onto axle housing.
5. After completing step 4, apply an additional load of 34300 -
49000 N (3500 - 5000 kg,7,718 - 11,025 lb). Rotate axle housing
in forward and reverse directions 10 times each to ensure a
good fit.
6. Place a spring balance at the point where the strut is joined (upper side bolt hole) and measure rotation
torque when spring is pulled at a speed of 8 -12 rpm. Refer to theRAX-15, "
Wheel Bearing"item.
NOTE:
If a load of 34300 - 49000 N (3500 - 5000 kg,7,718 - 11,025 lb) cannot be applied:
lInstall to drive shaft and tighten wheel hub lock nuts to specified torque. Rotate in forward and reverse
direction 10 times each to ensure a good fit.
lAt a rotation speed of 8 - 12 rpm, place a spring balance on hub bolt and measure rotation torque.
SDIA0156E
SDIA0157E
Rotation torque : 1.96 N·m (0.20 kg-m,17 in-lb) or less
Spring balance reading : 12.8 N (1.30 kg,2.87 lb) or less
Rotation torque : 1.126 N·m (0.11 kg-m,10 in-lb)
Spring balance reading : 19.70 N (2.01 kg,4.43 lb)
Page 2805 of 3066
REAR DRIVE SHAFT
RAX-9
C
E
F
G
H
I
J
K
L
MA
B
RAX
REAR DRIVE SHAFTPFP:39600
Removal and InstallationEDS000FL
REMOVAL
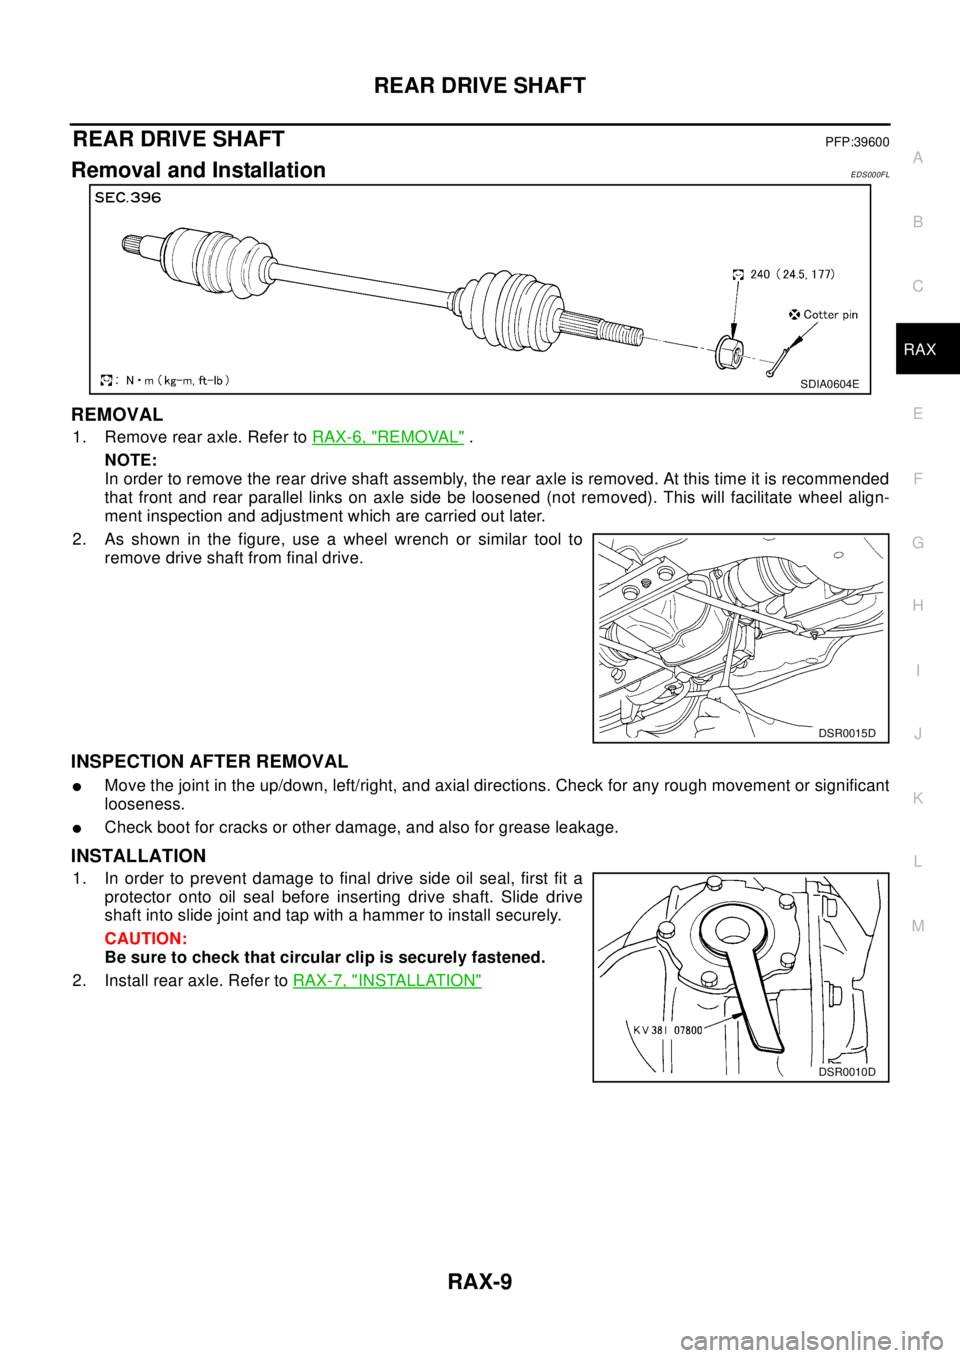
1. Remove rear axle. Refer toRAX-6, "REMOVAL".
NOTE:
In order to remove the rear drive shaft assembly, the rear axle is removed. At this time it is recommended
that front and rear parallel links on axle side be loosened (not removed). This will facilitate wheel align-
ment inspection and adjustment which are carried out later.
2. As shown in the figure, use a wheel wrench or similar tool to
remove drive shaft from final drive.
INSPECTION AFTER REMOVAL
lMove the joint in the up/down, left/right, and axial directions. Check for any rough movement or significant
looseness.
lCheck boot for cracks or other damage, and also for grease leakage.
INSTALLATION
1. In order to prevent damage to final drive side oil seal, first fit a
protector onto oil seal before inserting drive shaft. Slide drive
shaft into slide joint and tap with a hammer to install securely.
CAUTION:
Be sure to check that circular clip is securely fastened.
2. Install rear axle. Refer toRAX-7, "
INSTALLATION"
SDIA0604E
DSR0015D
DSR0010D
Page 2806 of 3066
RAX-10
REAR DRIVE SHAFT
Disassembly and Assembly
EDS000FM
DISASSEMBLY
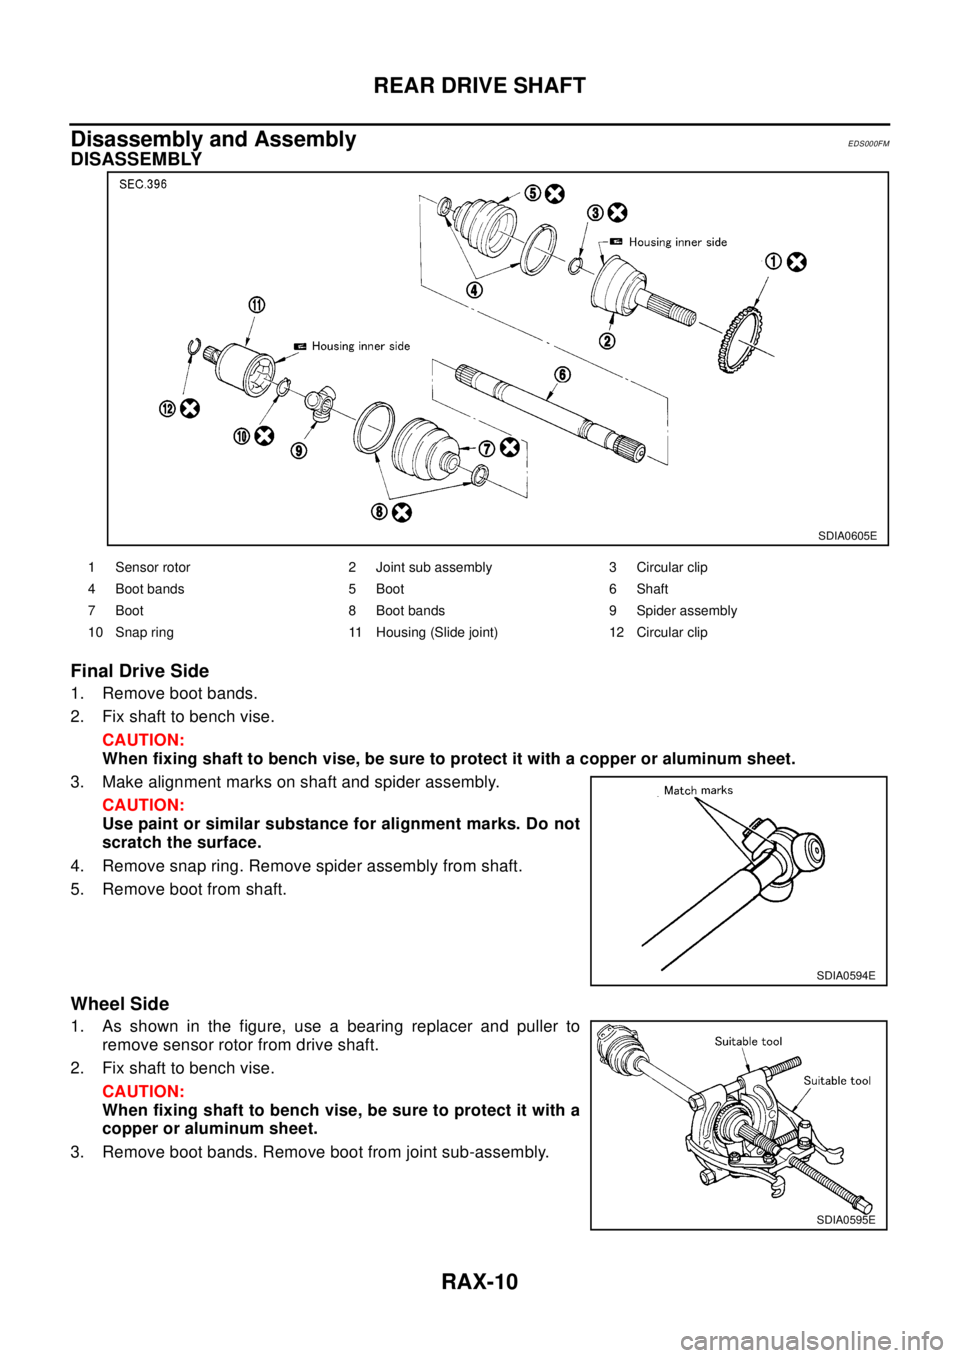
Final Drive Side
1. Remove boot bands.
2. Fix shaft to bench vise.
CAUTION:
When fixing shaft to bench vise, be sure to protect it with a copper or aluminum sheet.
3. Make alignment marks on shaft and spider assembly.
CAUTION:
Use paint or similar substance for alignment marks. Do not
scratch the surface.
4. Remove snap ring. Remove spider assembly from shaft.
5. Remove boot from shaft.
Wheel Side
1. As shown in the figure, use a bearing replacer and puller to
remove sensor rotor from drive shaft.
2. Fix shaft to bench vise.
CAUTION:
When fixing shaft to bench vise, be sure to protect it with a
copper or aluminum sheet.
3. Remove boot bands. Remove boot from joint sub-assembly.
SDIA0605E
1 Sensor rotor 2 Joint sub assembly 3 Circular clip
4 Boot bands 5 Boot 6 Shaft
7 Boot 8 Boot bands 9 Spider assembly
10 Snap ring 11 Housing (Slide joint) 12 Circular clip
SDIA0594E
SDIA0595E
Page 2807 of 3066
REAR DRIVE SHAFT
RAX-11
C
E
F
G
H
I
J
K
L
MA
B
RAX
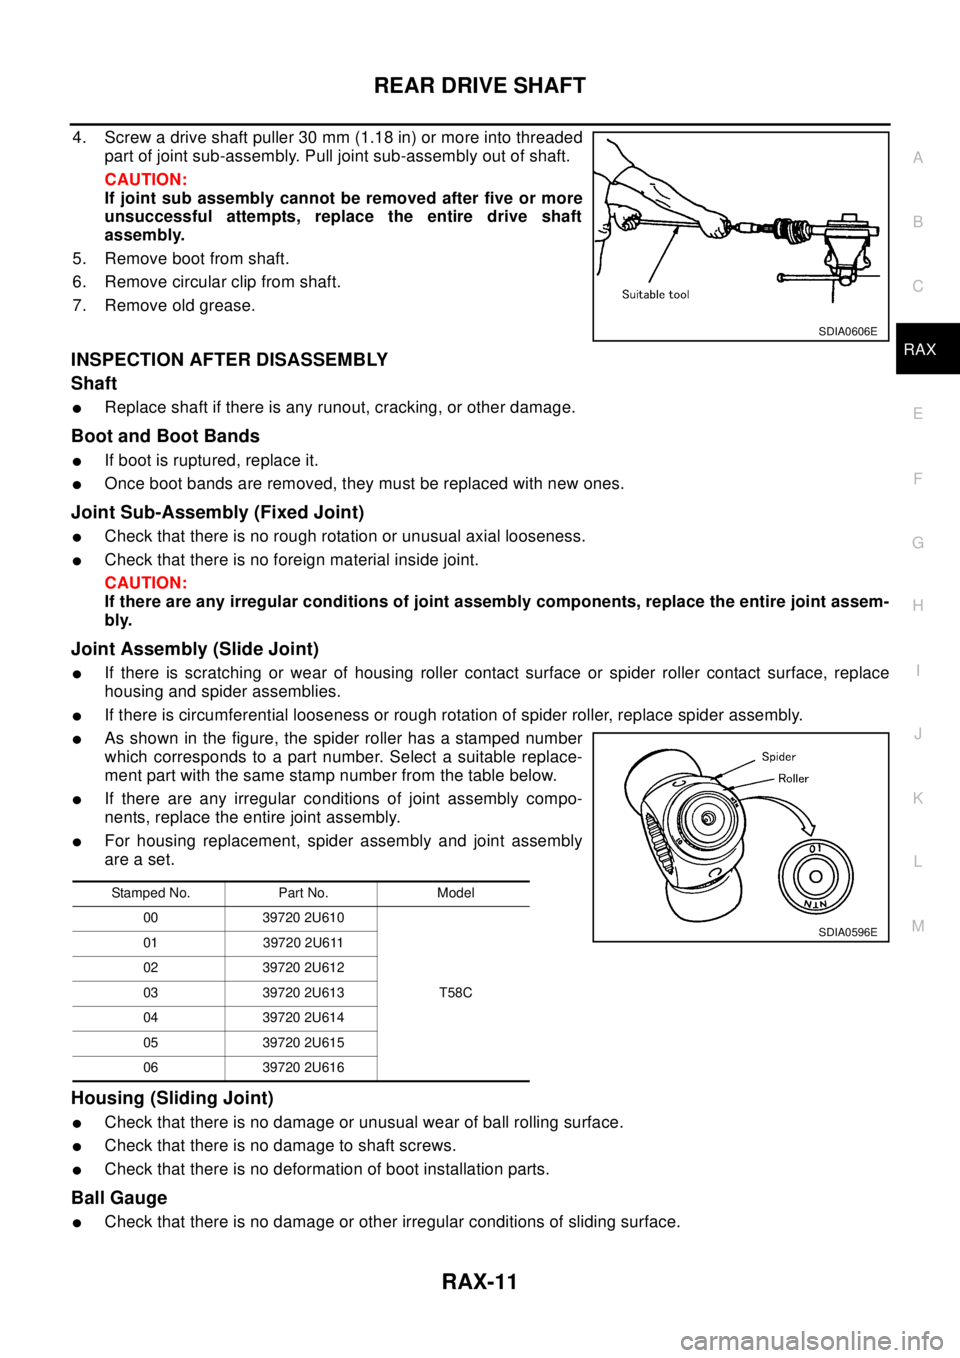
4. Screw a drive shaft puller 30 mm (1.18 in) or more into threaded
part of joint sub-assembly. Pull joint sub-assembly out of shaft.
CAUTION:
If joint sub assembly cannot be removed after five or more
unsuccessful attempts, replace the entire drive shaft
assembly.
5. Remove boot from shaft.
6. Remove circular clip from shaft.
7. Remove old grease.
INSPECTION AFTER DISASSEMBLY
Shaft
lReplace shaft if there is any runout, cracking, or other damage.
Boot and Boot Bands
lIf boot is ruptured, replace it.
lOnce boot bands are removed, they must be replaced with new ones.
Joint Sub-Assembly (Fixed Joint)
lCheck that there is no rough rotation or unusual axial looseness.
lCheck that there is no foreign material inside joint.
CAUTION:
If there are any irregular conditions of joint assembly components, replace the entire joint assem-
bly.
Joint Assembly (Slide Joint)
lIf there is scratching or wear of housing roller contact surface or spider roller contact surface, replace
housing and spider assemblies.
lIf there is circumferential looseness or rough rotation of spider roller, replace spider assembly.
lAs shown in the figure, the spider roller has a stamped number
which corresponds to a part number. Select a suitable replace-
ment part with the same stamp number from the table below.
lIf there are any irregular conditions of joint assembly compo-
nents, replace the entire joint assembly.
lFor housing replacement, spider assembly and joint assembly
are a set.
Housing (Sliding Joint)
lCheck that there is no damage or unusual wear of ball rolling surface.
lCheck that there is no damage to shaft screws.
lCheck that there is no deformation of boot installation parts.
Ball Gauge
lCheck that there is no damage or other irregular conditions of sliding surface.
SDIA0606E
Stamped No. Part No. Model
00 39720 2U610
T58C 01 39720 2U611
02 39720 2U612
03 39720 2U613
04 39720 2U614
05 39720 2U615
06 39720 2U616
SDIA0596E
Page 2808 of 3066
RAX-12
REAR DRIVE SHAFT
Steel Ball
lCheck that there is no damage or unusual wear.
Inner Case
lCheck that there is no damage or other irregular conditions of ball rolling surface.
lCheck that there is no damage to serrated part.
ASSEMBLY
Final Drive Side
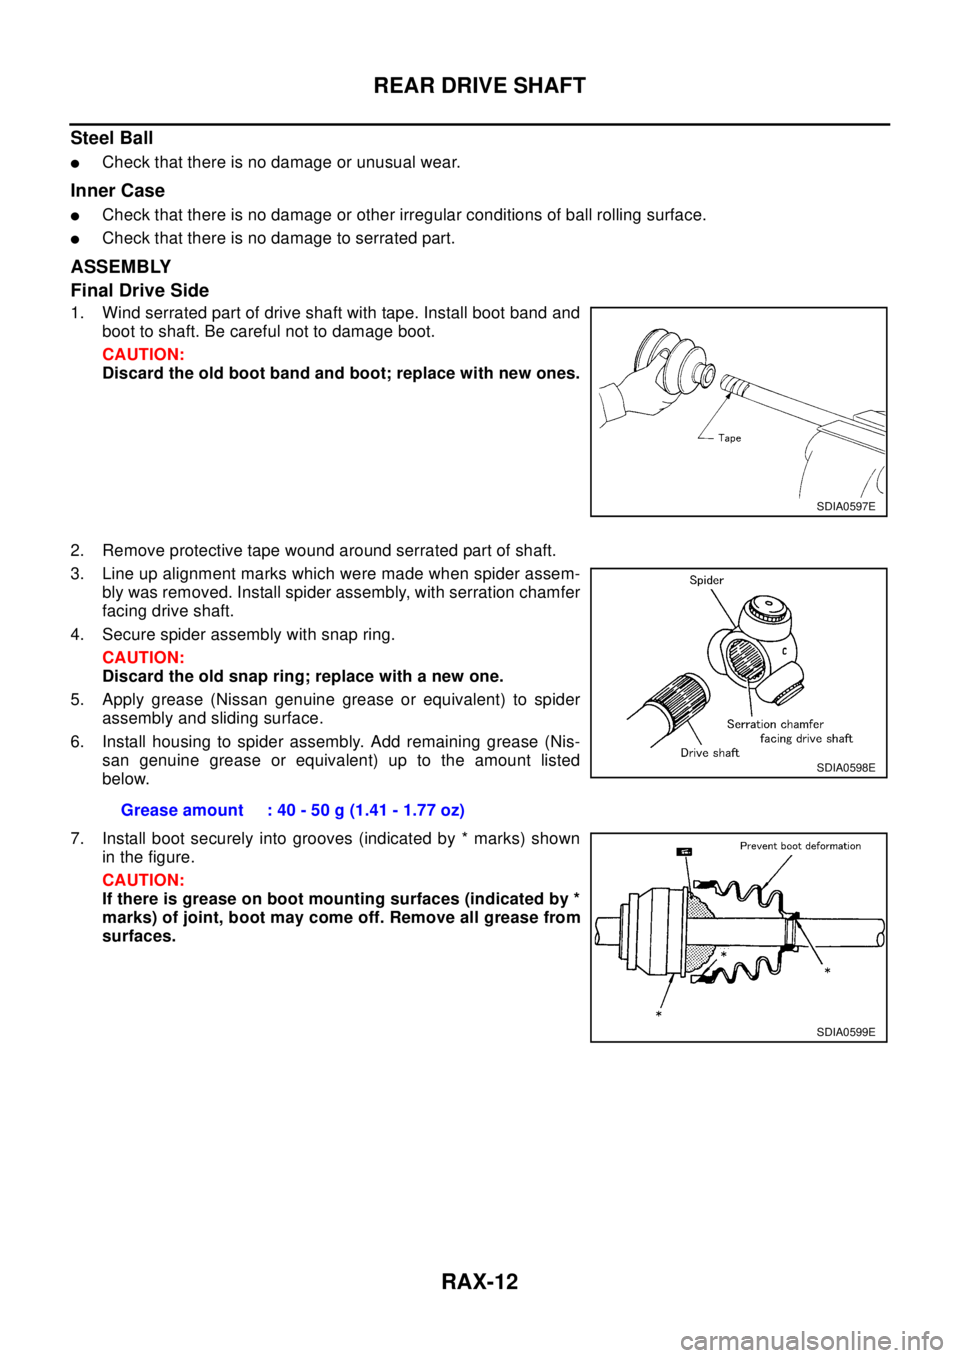
1. Wind serrated part of drive shaft with tape. Install boot band and
boot to shaft. Be careful not to damage boot.
CAUTION:
Discard the old boot band and boot; replace with new ones.
2. Remove protective tape wound around serrated part of shaft.
3. Line up alignment marks which were made when spider assem-
bly was removed. Install spider assembly, with serration chamfer
facing drive shaft.
4. Secure spider assembly with snap ring.
CAUTION:
Discard the old snap ring; replace with a new one.
5. Apply grease (Nissan genuine grease or equivalent) to spider
assembly and sliding surface.
6. Install housing to spider assembly. Add remaining grease (Nis-
san genuine grease or equivalent) up to the amount listed
below.
7. Install boot securely into grooves (indicated by * marks) shown
in the figure.
CAUTION:
If there is grease on boot mounting surfaces (indicated by *
marks) of joint, boot may come off. Remove all grease from
surfaces.
SDIA0597E
Grease amount : 40 - 50 g (1.41 - 1.77 oz)
SDIA0598E
SDIA0599E
Page 2809 of 3066
REAR DRIVE SHAFT
RAX-13
C
E
F
G
H
I
J
K
L
MA
B
RAX
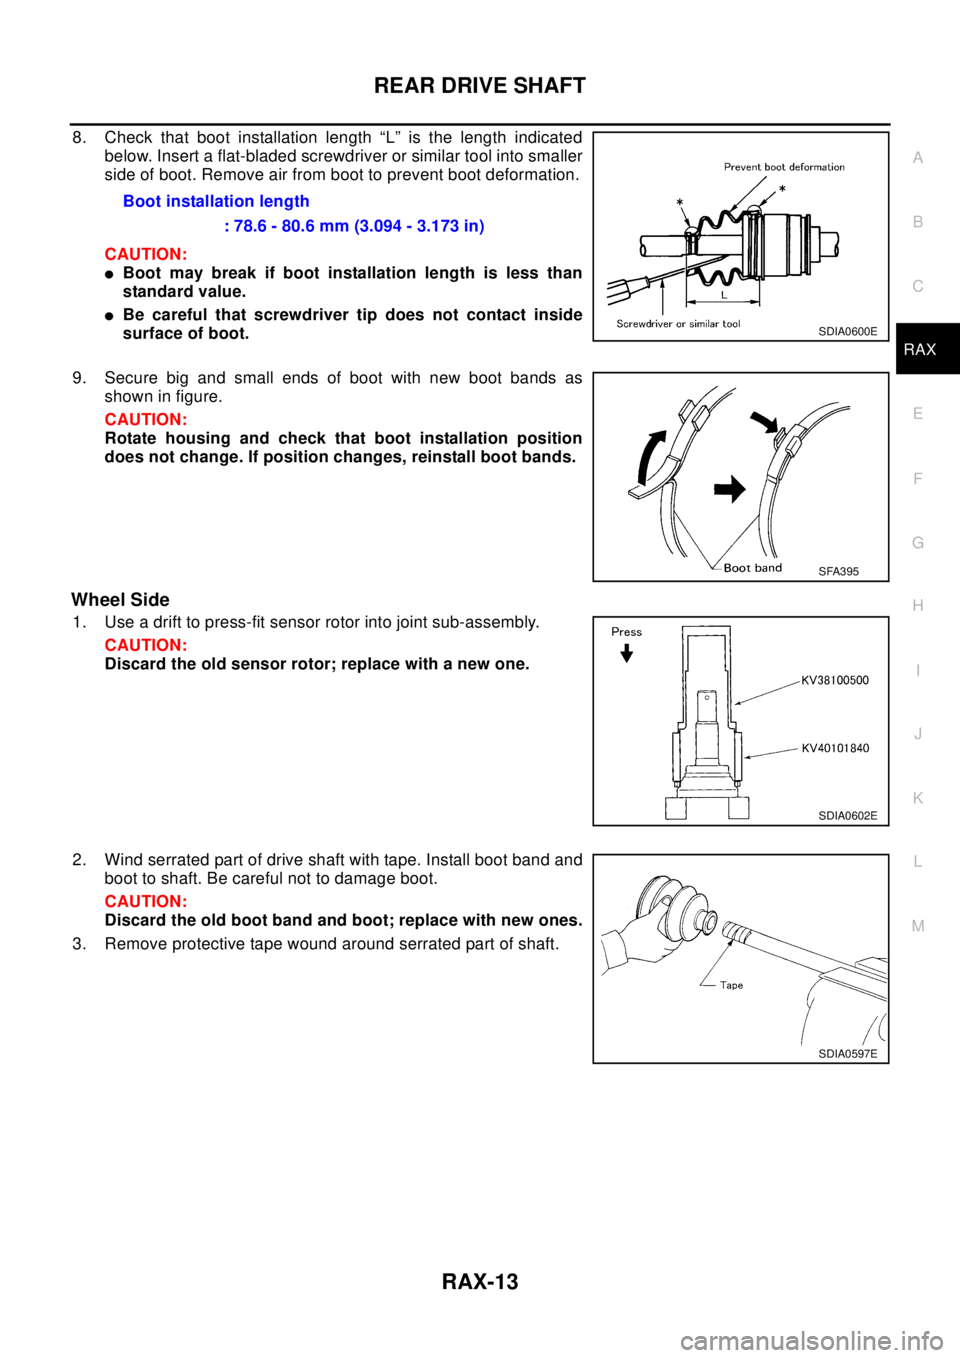
8. Check that boot installation length “L” is the length indicated
below. Insert a flat-bladed screwdriver or similar tool into smaller
side of boot. Remove air from boot to prevent boot deformation.
CAUTION:
lBoot may break if boot installation length is less than
standard value.
lBe careful that screwdriver tip does not contact inside
surface of boot.
9. Secure big and small ends of boot with new boot bands as
shown in figure.
CAUTION:
Rotate housing and check that boot installation position
does not change. If position changes, reinstall boot bands.
Wheel Side
1. Use a drift to press-fit sensor rotor into joint sub-assembly.
CAUTION:
Discard the old sensor rotor; replace with a new one.
2. Wind serrated part of drive shaft with tape. Install boot band and
boot to shaft. Be careful not to damage boot.
CAUTION:
Discard the old boot band and boot; replace with new ones.
3. Remove protective tape wound around serrated part of shaft.Boot installation length
: 78.6 - 80.6 mm (3.094 - 3.173 in)
SDIA0600E
SFA395
SDIA0602E
SDIA0597E
Page 2810 of 3066
RAX-14
REAR DRIVE SHAFT
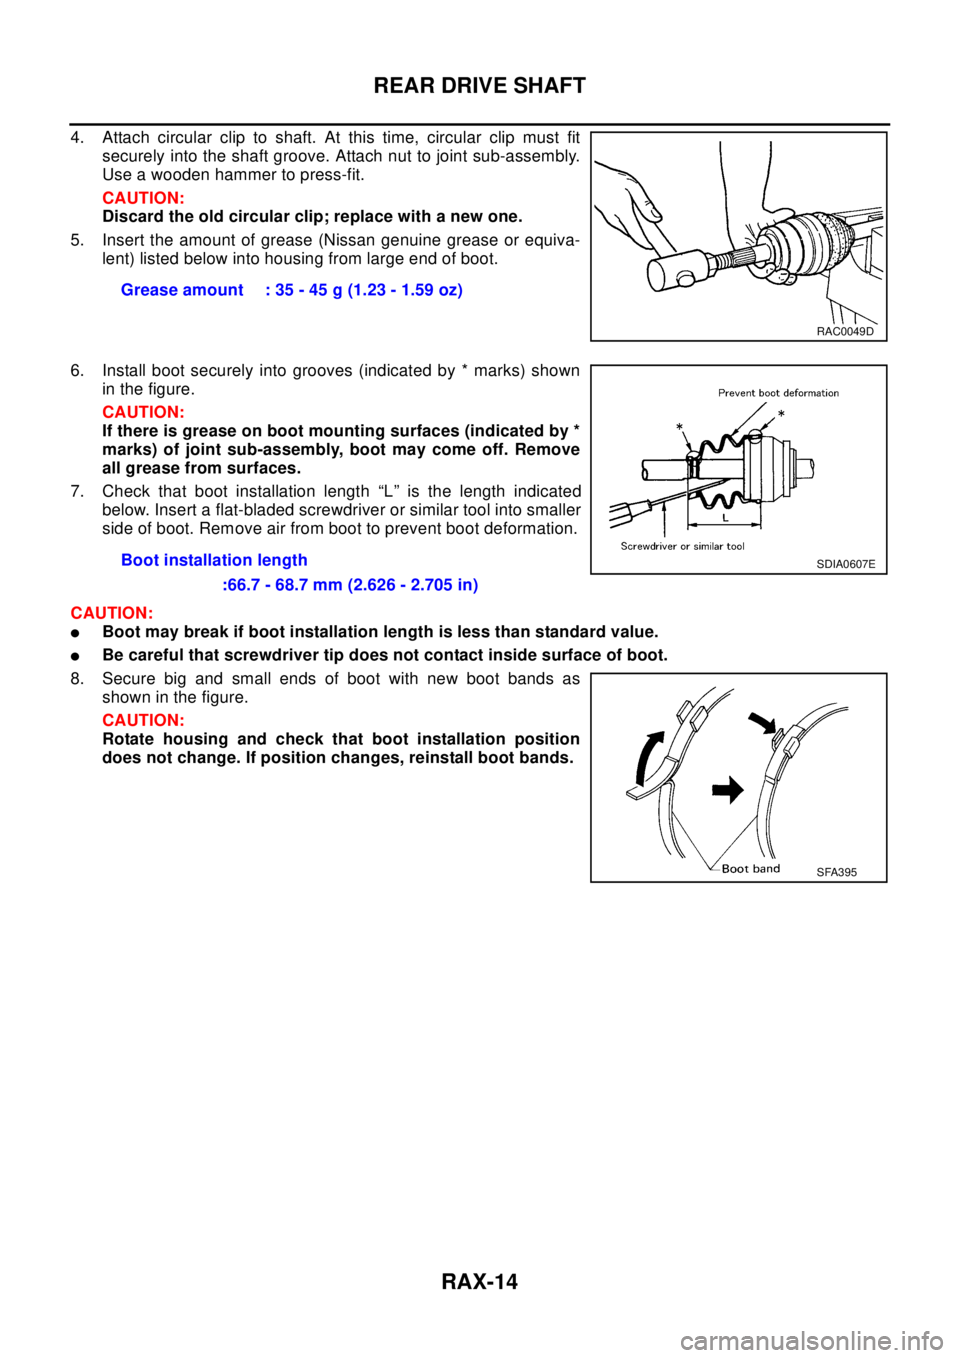
4. Attach circular clip to shaft. At this time, circular clip must fit
securely into the shaft groove. Attach nut to joint sub-assembly.
Use a wooden hammer to press-fit.
CAUTION:
Discard the old circular clip; replace with a new one.
5. Insert the amount of grease (Nissan genuine grease or equiva-
lent) listed below into housing from large end of boot.
6. Install boot securely into grooves (indicated by * marks) shown
in the figure.
CAUTION:
If there is grease on boot mounting surfaces (indicated by *
marks) of joint sub-assembly, boot may come off. Remove
all grease from surfaces.
7. Check that boot installation length “L” is the length indicated
below. Insert a flat-bladed screwdriver or similar tool into smaller
side of boot. Remove air from boot to prevent boot deformation.
CAUTION:
lBoot may break if boot installation length is less than standard value.
lBe careful that screwdriver tip does not contact inside surface of boot.
8. Secure big and small ends of boot with new boot bands as
shown in the figure.
CAUTION:
Rotate housing and check that boot installation position
does not change. If position changes, reinstall boot bands.Grease amount : 35 - 45 g (1.23 - 1.59 oz)
RAC0049D
Boot installation length
:66.7 - 68.7 mm (2.626 - 2.705 in)SDIA0607E
SFA395